The doorbell rang, startling me from my afternoon chaos – laundry mountain, a half-finished school project, and the faint, sweet scent of a forgotten banana bread. It was Liam, my middle son, with a gaggle of his friends, all declaring, “Mom, we’re SO hungry!” My heart sank a little. It was one of those scorching summer days, and the thought of firing up the oven for a snack was a non-starter.
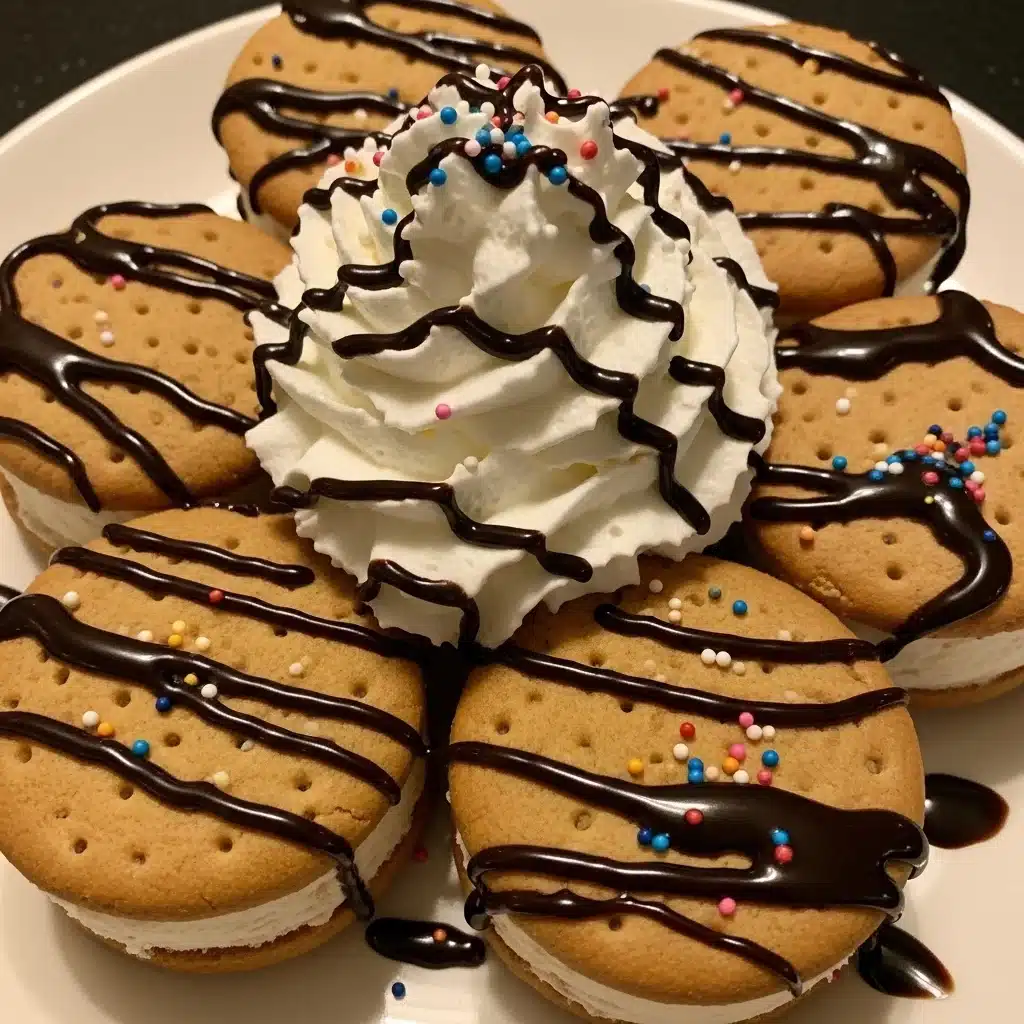
Then, a memory flickered: a stack of ice cream sandwiches tucked away in the freezer, a simple carton of whipped topping, and that little bottle of chocolate syrup I keep hidden for emergencies. Eureka! Within minutes, I had them gathered in the kitchen, their eyes wide as I layered those humble frozen treats into what quickly became a spectacular Ice Cream Sandwich Cake.
The gasps of delight as I drizzled chocolate and sprinkled confetti sprinkles were all the thanks I needed. Food, for me, is love, and this Ice Cream Sandwich Cake has become a go-to symbol of quick, delicious love in our home. It’s effortless, it’s fun, and it always brings smiles – whether for an unexpected crowd or a quiet family dessert. This no-bake wonder truly saves the day!
Why You’ll Love This Ice Cream Sandwich Cake Recipe
You absolutely need this Ice Cream Sandwich Cake in your life, especially if you juggle a busy schedule like I do. This isn’t just another dessert; it’s a lifesaver. First, it requires absolutely no baking.
That’s right, zero oven time, making it perfect for those scorching summer days or when your oven is already occupied with dinner. Second, the ingredient list is incredibly short and simple. You probably have most of these items on hand right now, or you can grab them during a quick grocery run.
Furthermore, you create this incredible dessert in mere minutes. Assembly takes practically no time at all. Then, you simply let your freezer do all the hard work.
Moreover, this Ice Cream Sandwich Cake is a guaranteed crowd-pleaser. Every single time I make this easy ice cream cake, guests rave about it. Kids adore it; adults secretly love it even more.
It brings back nostalgic childhood memories for many. This simple Ice Cream Sandwich Cake also offers fantastic versatility. You can easily customize it to suit any taste or occasion.
Think different ice cream sandwich flavors, various toppings, or even a themed decoration. Finally, as a mom of three, I can attest to its sheer convenience. When unexpected company arrives, or you just need a treat that feels special without any fuss, this Ice Cream Sandwich Cake delivers every single time. It truly embodies simple, nourishing joy.
Ingredients You’ll Need
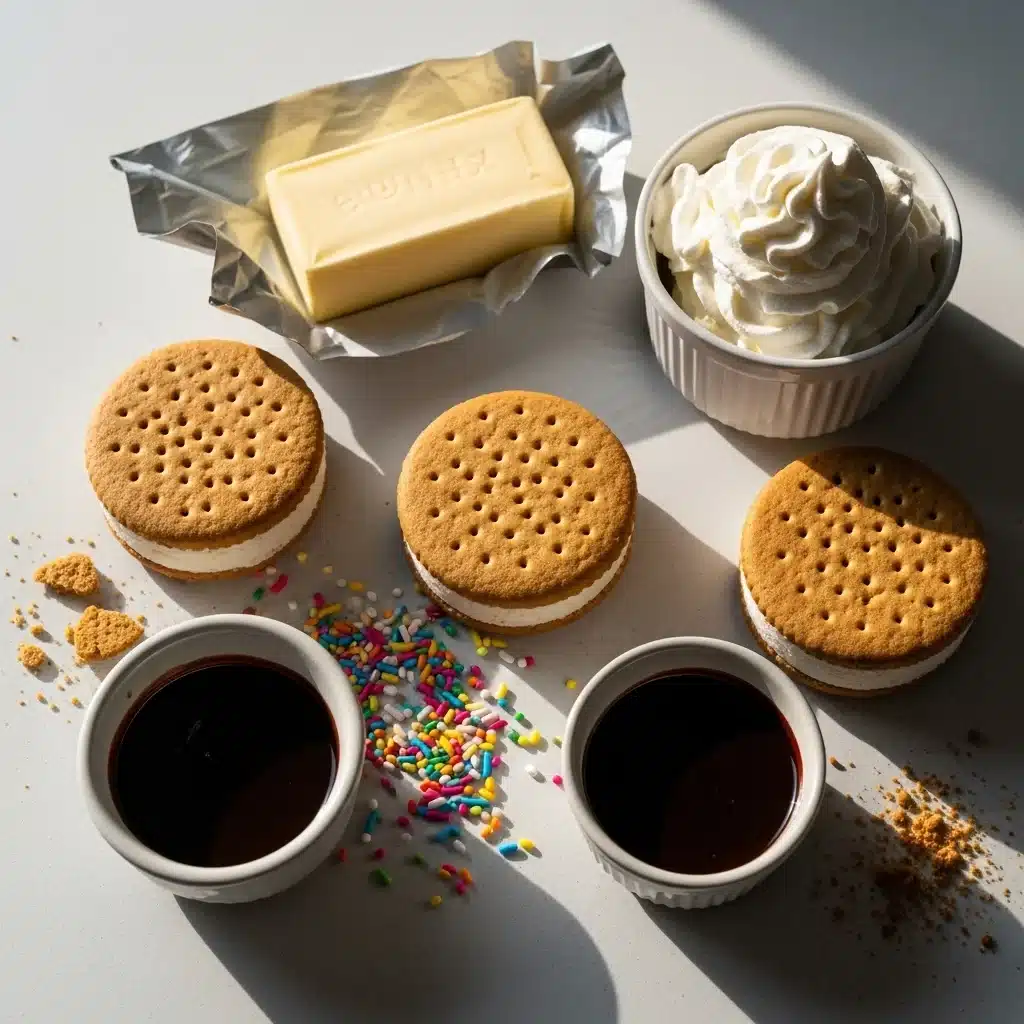
Gathering the ingredients for this amazing Ice Cream Sandwich Cake is incredibly easy. You only need a few staple items to create this crowd-pleasing dessert. Here’s what you will need:
| Ingredient | Quantity | Notes |
|---|---|---|
| Ice Cream Sandwiches | 18-24 (two 12-count boxes) | Standard rectangle shape works best. Vanilla is classic, but choose your favorite flavor! |
| Frozen Whipped Topping | 1 (16-ounce) container | Thaw it in the refrigerator before use. Cool Whip is a popular choice. |
| Chocolate Syrup | 1/2 cup | Your favorite brand for drizzling. |
| Sprinkles | 1/4 cup | Choose colorful ones for a festive touch! |
| Optional: Hot Fudge Sauce | 1/4 cup | For extra chocolatey goodness. |
| Optional: Crushed Cookies/Candies | 1/2 cup | Oreos, Heath Bar bits, mini M&M’s work wonderfully. |
You will find these ingredients readily available at any grocery store. Make sure you select good quality ice cream sandwiches, as they form the foundation of your delicious Ice Cream Sandwich Cake. The frozen whipped topping provides that creamy, airy texture.
Chocolate syrup adds a classic sweetness. And sprinkles? Well, sprinkles just make everything more fun, especially an Ice Cream Sandwich Cake!
Substitutions & Variations
One of the best things about this Ice Cream Sandwich Cake recipe is its incredible flexibility. You can truly make it your own with just a few simple tweaks. Do not hesitate to get creative!
First, consider the ice cream sandwiches themselves. While classic vanilla is always a hit, experiment with different flavors. Mint chocolate chip ice cream sandwiches create a refreshing twist.
Chocolate ice cream sandwiches result in a double chocolate delight. Even cookies and cream ice cream sandwiches make a fantastic base for your Ice Cream Sandwich Cake. You could even mix and match flavors for a layered surprise!
Next, think about the creamy topping. While frozen whipped topping works beautifully, you can certainly use homemade whipped cream for a richer, less sweet option. Just stabilize it slightly with a touch of powdered sugar and a teaspoon of cornstarch to help it hold its shape. You could also try a cream cheese frosting for a tangier profile, although that makes it less “no-bake” in the traditional sense if you’re mixing it from scratch.
Now, let’s talk about the fun part: additions and drizzles! Instead of just chocolate syrup, try caramel sauce for a gooey, sweet contrast. Raspberry sauce adds a fruity brightness.
For a gourmet touch, use a homemade ganache. Furthermore, mix in crushed candies like Snickers, Butterfingers, or even mini peanut butter cups between layers. Add chopped nuts for crunch – pecans, walnuts, or peanuts all work well. Fresh berries like sliced strawberries or raspberries can also provide a wonderful freshness, especially when adding them just before serving.
To cater to dietary needs, you can explore options. Many brands now offer gluten-free ice cream sandwiches, making this Ice Cream Sandwich Cake accessible for those with sensitivities. Similarly, dairy-free ice cream sandwiches are becoming more common.
Just ensure your whipped topping is also dairy-free if you go this route. These simple variations mean everyone can enjoy a slice of this delightful Ice Cream Sandwich Cake.
One of the best things about this Ice Cream Sandwich Cake recipe is its incredible flexibility. You can truly make it your own with just a few simple tweaks; for example, consider trying out these delicious Mango Sticky Rice Cups for a tropical twist.
Step-by-Step Instructions
Creating your amazing Ice Cream Sandwich Cake is incredibly straightforward. You will assemble this dessert in just a few easy steps. Get ready for a delicious, no-fuss treat!
Step 1: Prepare Your Pan.
First, line a 9×13-inch baking dish or a deep serving dish with plastic wrap, leaving an overhang on all sides. This step is crucial for easy removal of your finished Ice Cream Sandwich Cake.
Step 2: Create the First Layer of Ice Cream Sandwiches.
Next, unwrap your ice cream sandwiches. Arrange a single layer of ice cream sandwiches snugly at the bottom of your prepared pan. You might need to gently cut or break a few to fill in any gaps perfectly, forming a solid base for your Ice Cream Sandwich Cake.
Step 3: Add the First Whipped Topping Layer.
Then, spread half of your thawed whipped topping evenly over the layer of ice cream sandwiches. Use an offset spatula or the back of a spoon to create a smooth, consistent layer.
Step 4: Drizzle and Sprinkle.
Now, generously drizzle half of the chocolate syrup over the whipped topping. If you are using any additional toppings like crushed cookies or candies, sprinkle half of those over this layer as well. This adds flavor and texture to your Ice Cream Sandwich Cake.
Step 5: Add the Second Layer of Ice Cream Sandwiches.
Carefully place another layer of ice cream sandwiches over the whipped topping and toppings. Again, arrange them tightly, filling any spaces. This builds the height of your delicious Ice Cream Sandwich Cake.
Step 6: Finish with Whipped Topping and Toppings.
Spread the remaining whipped topping over the second layer of ice cream sandwiches. Drizzle the rest of the chocolate syrup over the top.
Finally, sprinkle generously with colorful sprinkles and any remaining crushed cookies or candies. Your Ice Cream Sandwich Cake is really taking shape!
Step 7: Freeze.
Cover the dish tightly with the overhanging plastic wrap, or use additional plastic wrap. Place the entire Ice Cream Sandwich Cake into the freezer.
Freeze it for at least 4-6 hours, or preferably overnight. This allows the cake to firm up completely and the layers to meld together perfectly.
Step 8: Serve.
When you are ready to serve your homemade Ice Cream Sandwich Cake, simply grab the edges of the plastic wrap to lift the entire cake out of the dish. Remove the plastic wrap, slice it into generous squares, and enjoy! This Ice Cream Sandwich Cake is always a huge hit.
Pro Tips for Success

Making a fantastic Ice Cream Sandwich Cake is already pretty simple, but a few insider tips can elevate your dessert from great to absolutely legendary.
First, work quickly and keep things cold. Ice cream sandwiches melt fast! Have all your ingredients ready and measured before you start assembling.
This minimizes the time the ice cream spends out of the freezer, ensuring a solid Ice Cream Sandwich Cake. You can even pop the pan and your whipped topping into the freezer for 10-15 minutes before you begin to give yourself more working time.
Second, line your pan correctly. The plastic wrap lining is not optional; it’s essential for a clean lift-out. Make sure you leave plenty of overhang on all sides.
This allows you to easily grab and lift the entire Ice Cream Sandwich Cake out of the dish without any sticky mess. I always use two pieces of plastic wrap, crisscrossing them, for maximum coverage and strength.
Third, don’t skimp on freezing time. While 4-6 hours is the minimum, an overnight freeze is truly ideal for your Ice Cream Sandwich Cake. This ensures every layer is perfectly firm and set, making for cleaner slices and a more enjoyable texture. Patience pays off when it comes to this no-bake ice cream cake.
Fourth, use a warm knife for clean slices. When you are ready to serve your Ice Cream Sandwich Cake, dip a sharp knife into hot water, wipe it dry, and then make your cut. Repeat this process for each slice. This simple trick prevents the cake from sticking to the knife and gives you beautiful, neat portions.
Fifth, customize your layers thoughtfully. While chocolate syrup is classic, consider spreading a thin layer of softened peanut butter, dulce de leche, or even a fruit preserve between the ice cream sandwich and whipped topping layers for an extra burst of flavor in your Ice Cream Sandwich Cake. Just remember that less is more with these thicker additions, so they don’t overpower the main flavors.
Finally, decorate just before serving. While sprinkles can go on before freezing, any fresh fruit or delicate garnishes like chocolate shavings or a final drizzle of warm fudge sauce look best when added right before you present your beautiful Ice Cream Sandwich Cake. These small details truly enhance the visual appeal of your ice cream sandwich dessert.
Making a fantastic Ice Cream Sandwich Cake is already pretty simple, but a few insider tips can elevate your dessert from great to absolutely legendary. To enhance your skills further, check out these expert tricks for making Strawberry Ice Cream Sandwich Cookies.
Storage & Reheating Tips
Storing your Ice Cream Sandwich Cake properly ensures you can enjoy it for days to come. Since this is an ice cream-based dessert, freezing is your best friend.
Once you have assembled your Ice Cream Sandwich Cake and allowed it to freeze completely, you must keep it in an airtight environment in the freezer. The plastic wrap you used to line the pan usually provides a good initial seal.
For longer storage, I always recommend wrapping the entire cake (once lifted from the pan) in an additional layer of aluminum foil or placing it in a large, freezer-safe container. This extra protection prevents freezer burn and keeps your Ice Cream Sandwich Cake fresh and delicious.
You can safely store your Ice Cream Sandwich Cake in the freezer for up to 2-3 weeks. Beyond that, the texture might start to deteriorate, and it could pick up odors from other items in your freezer, even with proper wrapping.
Reheating is definitely not applicable for this dessert. This is a no-bake, frozen treat! You serve your Ice Cream Sandwich Cake directly from the freezer.
If it feels too hard to cut immediately, let it sit on the counter for 5-10 minutes to soften slightly. However, you want to serve it still very much frozen for the best experience. Avoid letting it sit out for too long, as it will quickly start to melt, turning your beautiful Ice Cream Sandwich Cake into a soggy mess.
Slice what you need, and return any leftovers to the freezer promptly. This helps maintain its perfect texture.
What to Serve With This Recipe

The Ice Cream Sandwich Cake stands wonderfully on its own as a show-stopping dessert. However, thinking about what to serve alongside it can enhance the whole experience.
For a casual backyard BBQ or a kids’ birthday party, this Ice Cream Sandwich Cake pairs beautifully with classic summer dishes. Think grilled hot dogs, juicy burgers, or a vibrant potato salad. You want the main meal to be relatively light and savory, creating a perfect contrast to the sweet, rich dessert. Simple fresh salads also complement the richness of the ice cream cake well.
If you are hosting a more relaxed gathering, consider serving your Ice Cream Sandwich Cake after a simple meal like homemade pizzas or a comforting casserole. The ease of the dessert allows you more time to focus on the main course.
Beverage-wise, keep it simple and refreshing. A tall glass of cold milk is a classic pairing that kids (and many adults!) will love with their slice of Ice Cream Sandwich Cake. Iced tea or lemonade offer a crisp, thirst-quenching option. For the adults, a cup of freshly brewed coffee or a light digestif can round out the meal perfectly after enjoying this delightful ice cream sandwich dessert.
Finally, while the Ice Cream Sandwich Cake is complete on its own, a tiny bowl of extra fresh berries (like raspberries or sliced strawberries) on the side provides a lovely fresh counterpoint if you wish. This adds a little brightness without overwhelming the star of the show – your amazing Ice Cream Sandwich Cake!
The Ice Cream Sandwich Cake stands wonderfully on its own as a show-stopping dessert. However, if you want to impress your guests even more, consider serving it alongside a refreshing Lemon Blueberry Icebox Cake.
FAQs
Can I make this Ice Cream Sandwich Cake ahead of time?
Absolutely! In fact, making your Ice Cream Sandwich Cake ahead of time is highly recommended. You can prepare it a day or even two weeks in advance.
Just ensure you cover it tightly with plastic wrap and then foil to prevent freezer burn. Freezing it overnight gives the ice cream cake the best texture for slicing and serving.
What kind of ice cream sandwiches work best for this Ice Cream Sandwich Cake?
Standard rectangular ice cream sandwiches work best for this Ice Cream Sandwich Cake because they fit snugly into a 9×13-inch pan, creating a solid base. Vanilla is a classic choice, but feel free to experiment with chocolate, mint, or cookies and cream flavors to customize your ice cream sandwich dessert.
How long does Ice Cream Sandwich Cake need to freeze?
Your Ice Cream Sandwich Cake needs to freeze for a minimum of 4-6 hours. However, for the firmest texture and easiest slicing, I highly recommend freezing it overnight. This extended freeze time allows all the layers to set properly, resulting in a perfectly solid ice cream cake.
Can I use homemade whipped cream for this Ice Cream Sandwich Cake?
Yes, you certainly can use homemade whipped cream! For best results, use a stabilized whipped cream recipe (often including a little cream cheese or unflavored gelatin) to help it hold its shape longer. Otherwise, a simple homemade whipped cream will still taste delicious, but it might not hold its structure quite as well as the store-bought frozen whipped topping in your Ice Cream Sandwich Cake.
Is this Ice Cream Sandwich Cake suitable for large gatherings?
This Ice Cream Sandwich Cake is absolutely perfect for large gatherings! A 9×13-inch pan yields 12-16 generous servings, making it ideal for parties, potlucks, and family get-togethers. Its no-bake nature also means less stress for the host. You can even make two of these delicious ice cream sandwich cakes if you expect a very large crowd.
How do I cut clean slices of Ice Cream Sandwich Cake?
For perfectly clean slices of your Ice Cream Sandwich Cake, dip a sharp knife into hot water, wipe it dry, then make your cut. Repeat this process for each slice. This technique warms the blade slightly, allowing it to glide through the frozen layers more smoothly, giving you beautiful portions of ice cream cake.
Can I customize the flavors of my Ice Cream Sandwich Cake?
Absolutely! Customizing your Ice Cream Sandwich Cake is part of the fun. Use different flavored ice cream sandwiches, vary your drizzles (caramel, hot fudge, fruit sauces), and add various toppings like crushed candies, nuts, or even mini marshmallows. The possibilities are endless for your creative ice cream sandwich dessert.
Ice Cream Sandwich Cake is a fun and easy dessert made by layering ice cream sandwiches with whipped cream and toppings. This delightful treat is perfect for warm weather, and you can find out more about it in the detailed article on ice cream.
Nutrition Information (per serving)
*(Please note: This is an estimated nutritional breakdown for one serving of Ice Cream Sandwich Cake, based on standard ingredients and cutting the cake into 12 equal portions. Actual values may vary depending on specific brands and portion sizes.)*
| Nutrient | Amount (approx.) |
|---|---|
| Calories | 350 kcal |
| Total Fat | 16g |
| Saturated Fat | 8g |
| Cholesterol | 15mg |
| Sodium | 180mg |
| Total Carbohydrates | 48g |
| Dietary Fiber | 1g |
| Total Sugars | 35g |
| Protein | 4g |

Ice Cream Sandwich Cake
This Ice Cream Sandwich Cake is a quick and easy no-bake dessert that combines layers of ice cream sandwiches, whipped topping, and chocolate syrup for a delicious treat perfect for any occasion.
- Total Time: 6 hrs
- Yield: 12 servings 1x
Ingredients
18–24 Ice Cream Sandwiches
1 (16-ounce) container Frozen Whipped Topping
1/2 cup Chocolate Syrup
1/4 cup Sprinkles
1/4 cup Hot Fudge Sauce (optional)
1/2 cup Crushed Cookies/Candies (optional)
Instructions
- Line a 9×13-inch baking dish with plastic wrap
- Arrange a layer of ice cream sandwiches at the bottom of the pa
- Spread half of the thawed whipped topping over the ice cream sandwiches
- Drizzle half of the chocolate syrup and add any additional toppings
- Layer another set of ice cream sandwiches on top
- Spread the remaining whipped topping over the second layer of sandwiches
- Drizzle remaining chocolate syrup and sprinkle the top with sprinkles and other toppings
- Cover with plastic wrap and freeze for at least 4-6 hours, preferably overnight
- Remove from the freezer, slice, and serve
Notes
Customize with different flavors of ice cream sandwiches or toppings.
Use warm knife for cleaner slices.
- Prep Time: 10 mins
- Cook Time: 0 mins
- Category: Dessert
- Method: No-Bake
- Cuisine: American
- Diet: Gluten Free (if using gluten-free ice cream sandwiches)
Nutrition
- Serving Size: 1 slice
- Calories: 350 kcal
- Sugar: 35g
- Sodium: 180mg
- Fat: 16g
- Saturated Fat: 8g
- Unsaturated Fat: 0g
- Trans Fat: 0g
- Carbohydrates: 48g
- Fiber: 1g
- Protein: 4g
- Cholesterol: 15mg