Oh, the pure magic of childhood! I remember so clearly a particularly boisterous afternoon in our kitchen. My youngest, Leo, had just lost his first front tooth and was convinced that only the “biggest, pinkest, most funnest” treat could celebrate such a momentous occasion.
His eyes sparkled, and then, as if a lightbulb went off above his head, he declared, “Mommy, can we make a bubblegum cake?” My immediate thought was, “A bubblegum *cake*?” But then, the vision struck me: a vibrant, whimsical, and utterly delightful dessert that captured all the fun of bubblegum without the stickiness.
That day, our legendary Bubblegum Ice Cream Cake was born. It quickly became the requested centerpiece for every birthday, every celebration, and even just a regular Tuesday when we needed a little extra cheer.
It’s truly a labor of love, but one that rewards you with the biggest smiles and the sweetest memories. This Bubblegum Ice Cream Cake isn’t just a dessert; it’s an experience, a burst of joy in every scoop, and a testament to how food can create incredible moments. I promise, this vibrant and playful Bubblegum Ice Cream Cake will become an instant family favorite in your home too!
Why You’ll Love This Bubblegum Ice Cream Cake Recipe
You know, some recipes just feel like a hug, and this Bubblegum Ice Cream Cake is definitely one of them! First off, it’s an absolute showstopper. Imagine the gasps of delight when you bring out this colorful creation.
The vibrant hues alone promise fun! Beyond its stunning appearance, this Bubblegum Ice Cream Cake combines the best of all worlds: the creamy coolness of ice cream, the delightful crunch of a cookie crust, and that unmistakable, playful bubblegum flavor. It’s surprisingly simple to assemble, making it perfect for busy parents like me.
You don’t need fancy baking skills to create this masterpiece. Furthermore, this is the ultimate make-ahead dessert. You can prepare it days in advance, tuck it into the freezer, and then pull it out when you need a magical treat.
No last-minute stress, just pure enjoyment! It’s also incredibly versatile. You can easily adapt the colors and flavors to suit any preference or occasion.
Moreover, it’s a recipe that invites participation. Kids love helping to crush cookies, spread ice cream, and especially, sprinkle those adorable little candies. This Bubblegum Ice Cream Cake truly makes memories, not just a meal. It’s a delicious way to bring smiles to every face at your table.
Ingredients You’ll Need
Gathering your ingredients for this delightful Bubblegum Ice Cream Cake is half the fun! We aim for simplicity and quality, ensuring every component contributes to the overall magic of this dessert. You’ll find most of these items readily available at your local grocery store.
I’ve designed this list to be straightforward, allowing you to focus on the joy of creating rather than hunting for obscure items. For the best results with your Bubblegum Ice Cream Cake, always choose high-quality ingredients.
| Ingredient | Quantity | Notes |
|---|---|---|
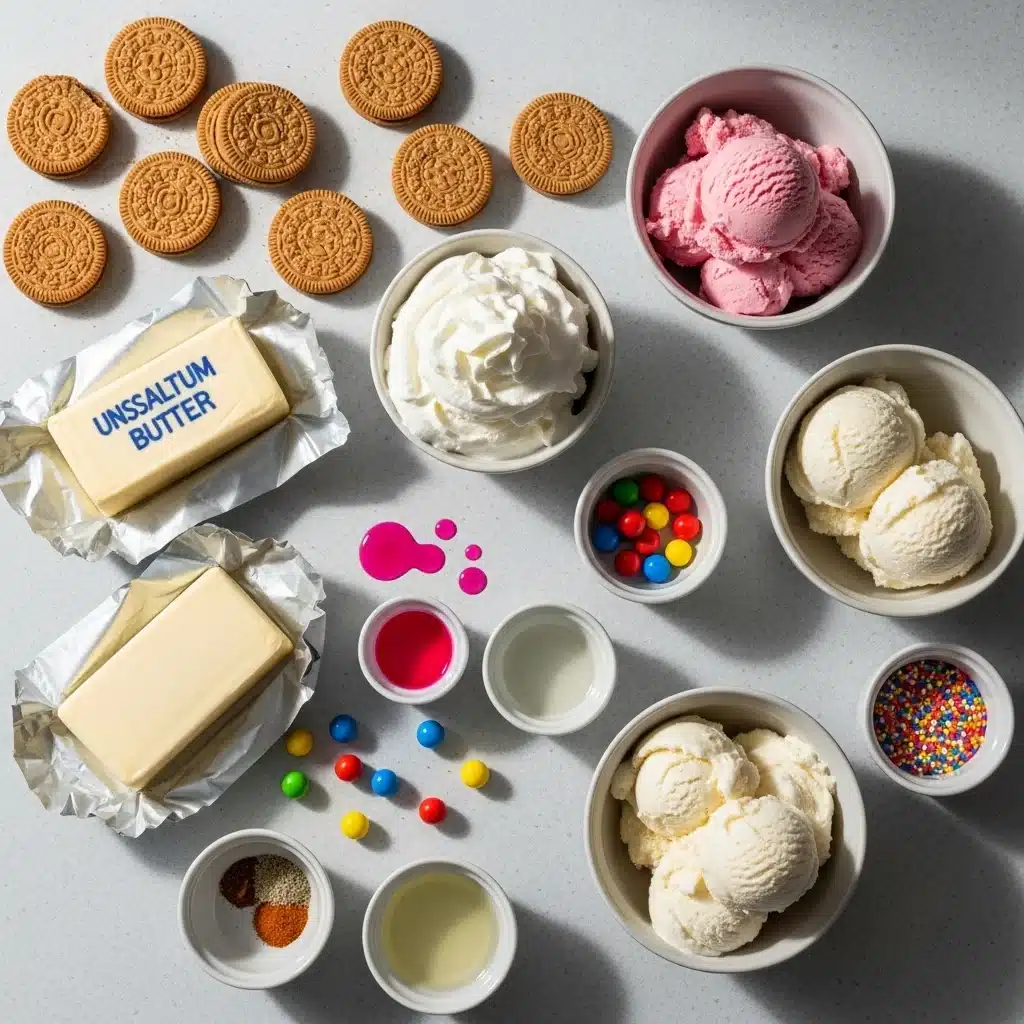
| Vanilla Sandwich Cookies | 1 (14.3 oz) package | Like Golden Oreos; crushed finely. |
| Unsalted Butter | 6 tablespoons | Melted. |
| Bubblegum Ice Cream | 1.5 quarts (or 3 pints) | Softened slightly for easier spreading. |
| Vanilla Ice Cream | 1 quart | Softened slightly. |
| Whipped Topping | 1 (12 oz) container | Thawed, like Cool Whip. |
| Pink Food Coloring | A few drops | Optional, for more vibrant color. |
| Mini Gumballs or Bubblegum Candies | 1/2 cup | For decoration. |
| Sprinkles | 2-3 tablespoons | Rainbow or themed sprinkles. |
| Optional: Bubblegum Extract | 1/2 teaspoon | For an extra flavor boost in the vanilla layer. |
Substitutions & Variations
One of the beautiful things about this Bubblegum Ice Cream Cake is its adaptability. Feel free to get creative and make it truly your own! If you can’t find specific ingredients or simply want to try something new, here are some fantastic ideas.
For the cookie crust, instead of vanilla sandwich cookies, you could use classic chocolate sandwich cookies for a striking contrast, or even graham crackers for a more traditional crust. Just adjust the melted butter accordingly. If bubblegum ice cream isn’t available in your local store, don’t despair!
You can create a fantastic substitute. Simply blend 1-2 teaspoons of bubblegum extract into softened vanilla ice cream. This gives you that signature bubblegum flavor perfectly.
Alternatively, choose another fun, brightly colored ice cream like cotton candy or birthday cake flavor. You are still creating a wonderfully festive dessert. For the whipped topping layer, while store-bought works beautifully for ease, you can certainly make homemade whipped cream.
Just sweeten heavy cream with a little powdered sugar and a touch of vanilla. You could even fold in a tiny drop of pink food coloring for an extra pop. To amp up the texture, consider adding a layer of chopped white chocolate chips or mini marshmallows between the ice cream layers.
This adds a delightful chewiness to your Bubblegum Ice Cream Cake. For decorations, besides gumballs and sprinkles, think about colorful candies, white chocolate curls, or even a drizzle of white chocolate ganache. The possibilities for personalizing your Bubblegum Ice Cream Cake are endless, allowing you to tailor it to any taste or occasion.
Step-by-Step Instructions
Let’s make some magic! This Bubblegum Ice Cream Cake comes together beautifully with these clear, simple steps. Follow them closely, and you’ll have a stunning dessert ready to impress everyone.
Remember, preparation is key, so make sure your ice cream is slightly softened but not completely melted before you begin.
- Prepare the Pan: First, line a 9-inch springform pan with plastic wrap, extending it over the sides. This makes removing your Bubblegum Ice Cream Cake incredibly easy later on.
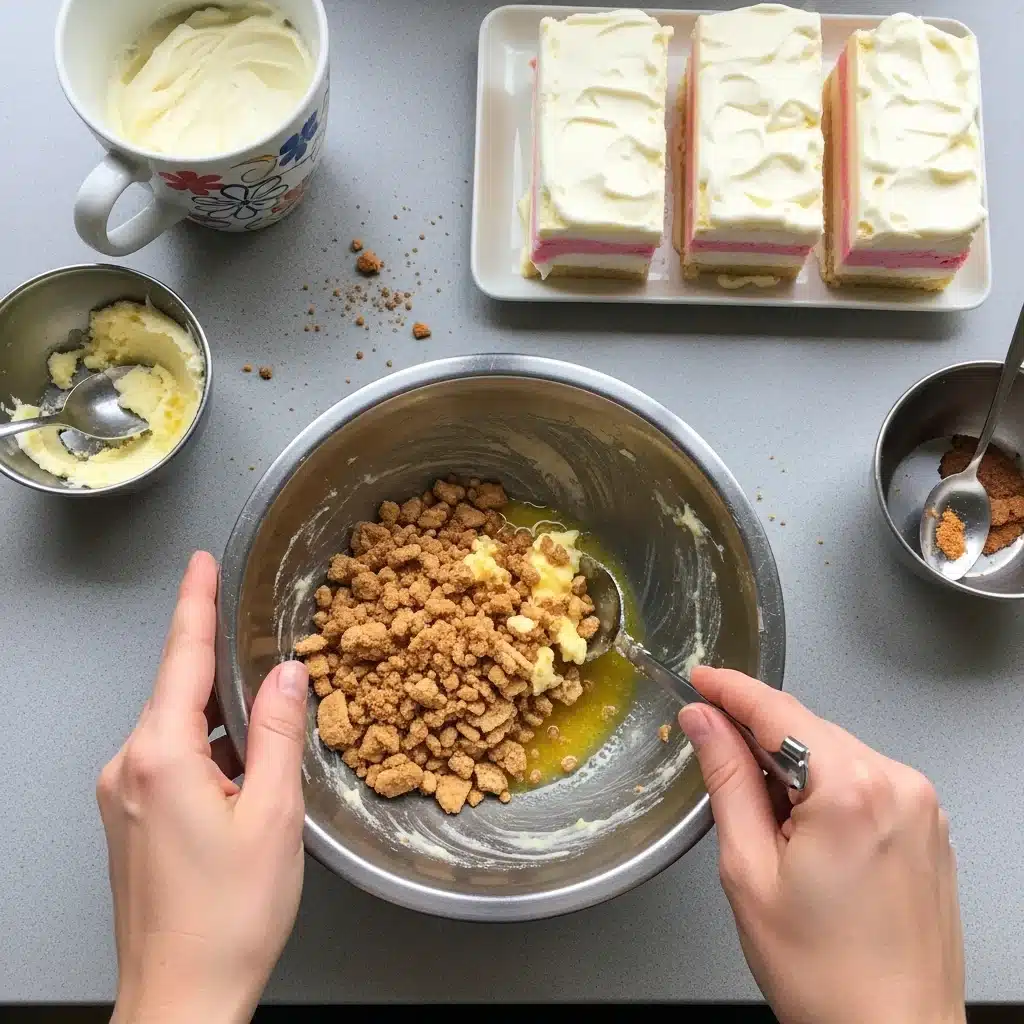
- Make the Crust: Next, place the vanilla sandwich cookies in a food processor and pulse until finely crushed. If you don’t have a food processor, place them in a zip-top bag and crush them with a rolling pin. Transfer the crumbs to a medium bowl.
- Combine Crust Ingredients: Pour the melted butter over the cookie crumbs. Stir thoroughly until the crumbs are evenly moistened. This creates the perfect base for our Bubblegum Ice Cream Cake.
- Press the Crust: Firmly press the buttered cookie mixture into the bottom of the prepared springform pan. Use the back of a spoon or your clean fingers to create an even, compact layer. Place the pan in the freezer for at least 15-20 minutes to set while you prepare the next layer.
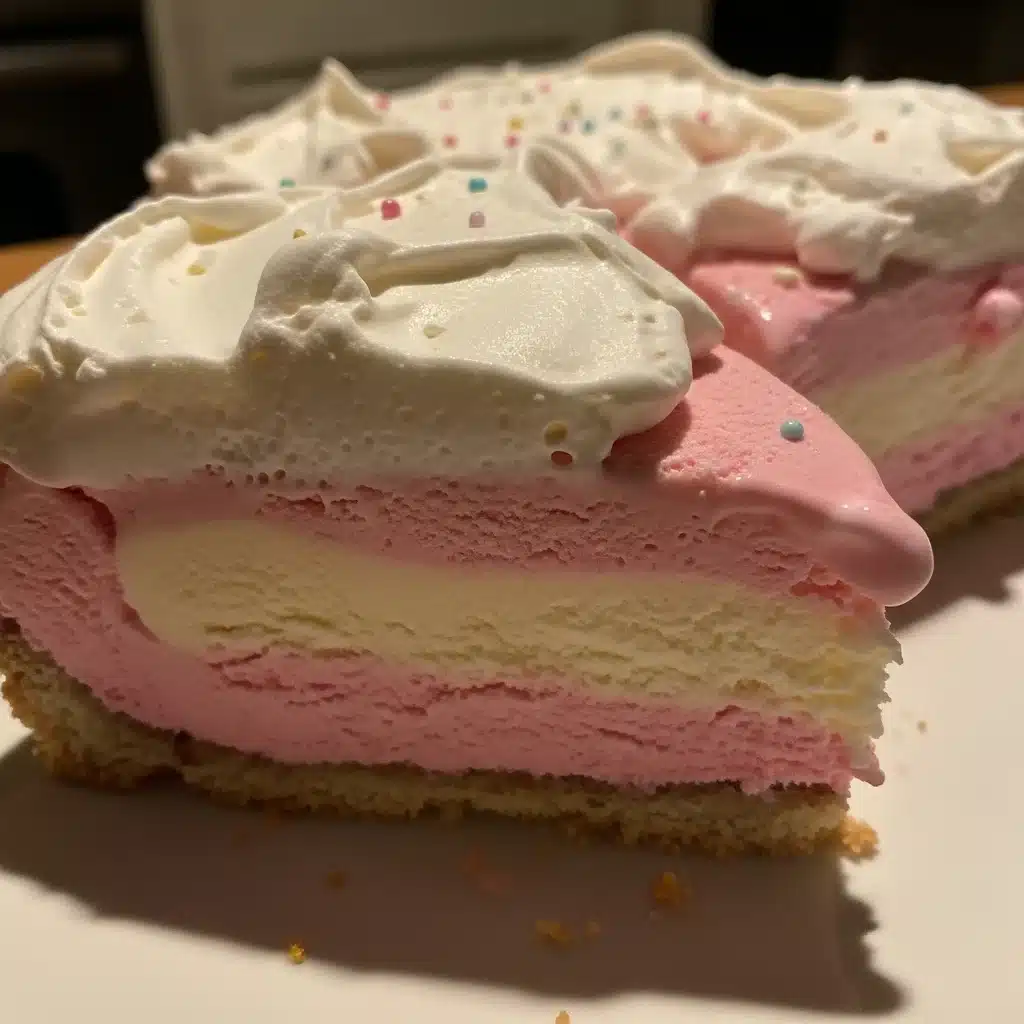
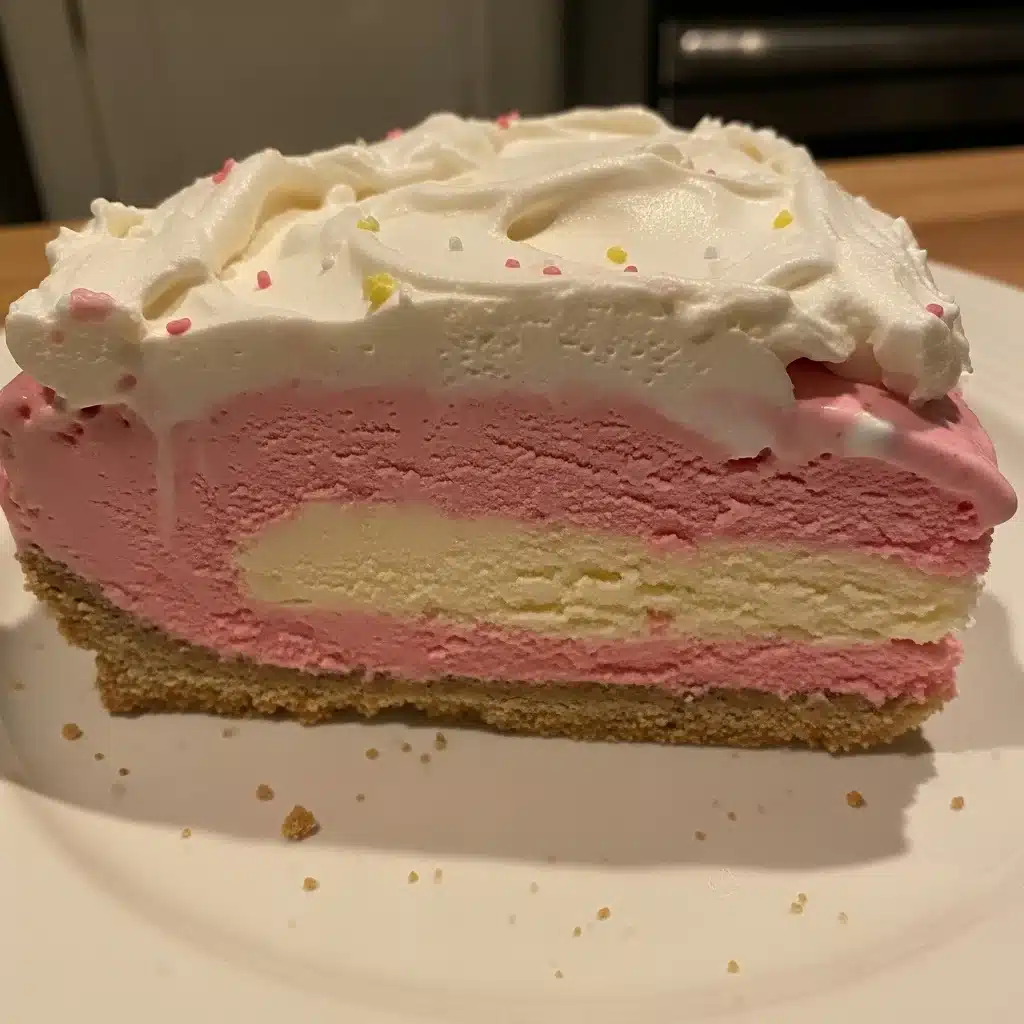
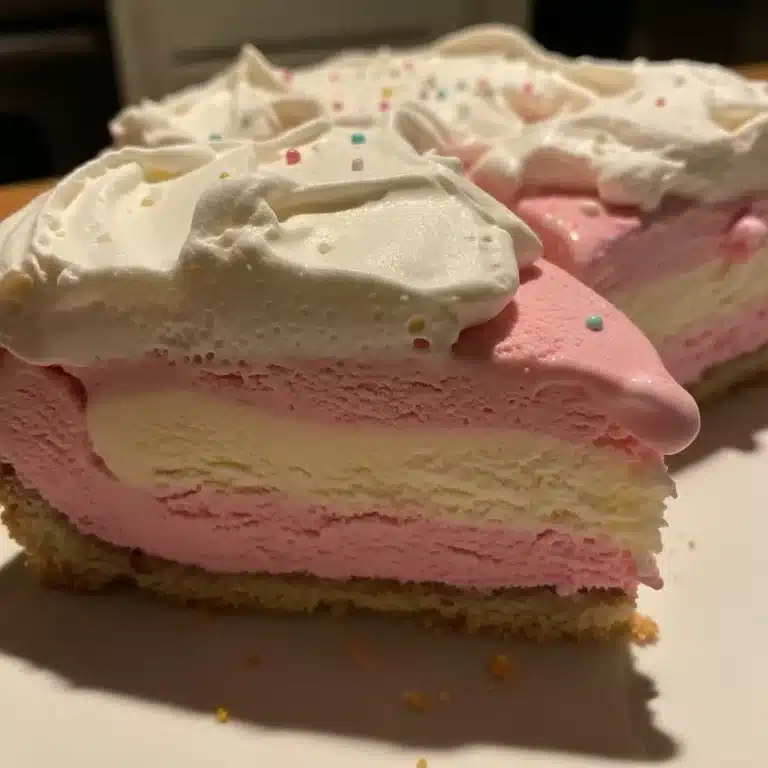
- First Ice Cream Layer (Bubblegum): Take the bubblegum ice cream out of the freezer and let it soften for about 10-15 minutes until it’s spreadable but still firm. Spoon it over the chilled cookie crust, spreading it evenly to the edges. Work quickly so the ice cream doesn’t melt too much. Return the pan to the freezer for at least 30-45 minutes, or until this layer is firm.
- Second Ice Cream Layer (Vanilla): Repeat the softening process with the vanilla ice cream. If desired, you can stir in 1/2 teaspoon of bubblegum extract at this stage for an extra flavor kick. Carefully spread the softened vanilla ice cream over the firm bubblegum layer. Smooth the top. Return the pan to the freezer for at least 2-3 hours, or preferably overnight, to allow the entire Bubblegum Ice Cream Cake to set completely.
- Prepare the Whipped Topping: Just before serving, or a few hours before if you want to freeze the topping too, gently fold a few drops of pink food coloring into the thawed whipped topping until you achieve your desired shade of pink.
- Decorate Your Cake: Remove the springform pan from the freezer. Carefully lift the Bubblegum Ice Cream Cake out of the pan using the plastic wrap handles. Peel away the plastic wrap. Spread the pink whipped topping evenly over the top and sides of the cake.
- Add the Final Touches: Immediately decorate with mini gumballs, sprinkles, or any other fun candies you chose. The colder the cake, the better the decorations will stick.
- Serve and Enjoy: Slice the Bubblegum Ice Cream Cake with a sharp knife dipped in hot water for clean cuts. Serve immediately and watch the smiles erupt!
Pro Tips for Success
Crafting the perfect Bubblegum Ice Cream Cake is simple, but a few insider tips can elevate your creation from great to absolutely unforgettable. Trust me, these little tricks make all the difference. First, and this is crucial, make sure your ice cream is at the right consistency.
It needs to be soft enough to spread easily but not so melted that it turns into a soupy mess. About 10-15 minutes on the counter usually does the trick for a 1.5-quart container. If it gets too soft, just pop it back into the freezer for a few minutes.
Another game-changer is using a springform pan lined with plastic wrap. This step seems minor but it ensures a flawless release of your finished Bubblegum Ice Cream Cake. You’ll thank yourself later when you effortlessly lift the cake out.
For super clean slices, always dip your knife in hot water and wipe it clean between each cut. This creates crisp, beautiful pieces, making your Bubblegum Ice Cream Cake look professionally made. Don’t rush the freezing time between layers.
Each layer needs to be firm before the next one goes on. This prevents the colors from bleeding and maintains those distinct, beautiful strata. Also, don’t overload your cake with too many gumballs on top; a scattered arrangement is often more appealing and easier to eat.
Finally, have all your decorations ready to go before you pull the cake out of the freezer for its final assembly. You want to apply them quickly while the whipped topping is still very cold, ensuring they stick perfectly. Following these tips will guarantee your Bubblegum Ice Cream Cake is not only delicious but also visually stunning.
Storage & Reheating Tips
Storing your magnificent Bubblegum Ice Cream Cake properly ensures every slice remains as delicious as the first. This is a dessert that thrives in the freezer, and with a few careful steps, it will stay perfect for future enjoyment. After serving, if you have any leftover Bubblegum Ice Cream Cake, immediately return it to the freezer.
The key is to minimize the time it spends at room temperature. For optimal storage, cover the cake tightly. You can do this by wrapping the entire remaining cake in several layers of plastic wrap, making sure no air can get in.
Then, add a layer of aluminum foil for extra protection against freezer burn. If you used a springform pan, you can often keep the bottom part of the pan on and just wrap the top and sides. For smaller individual slices, wrap each slice separately in plastic wrap and then place them in an airtight freezer-safe container.
This makes it super convenient to grab a single serving whenever a craving strikes! When stored correctly, your Bubblegum Ice Cream Cake will maintain its quality for up to 2-3 weeks in the freezer. There’s no “reheating” involved with an ice cream cake, of course.
When you’re ready to enjoy another slice, simply remove it from the freezer a few minutes before serving. Letting it sit at room temperature for 5-10 minutes allows it to soften slightly, making it easier to slice and enhancing its creamy texture. Avoid letting it sit out for too long, as it will melt. Always return any unused portions of your Bubblegum Ice Cream Cake promptly to the freezer to keep it firm and delicious.
What to Serve With This Bubblegum Ice Cream Cake Recipe
The Bubblegum Ice Cream Cake is truly a star on its own, a vibrant centerpiece that steals the show. But if you’re hosting a celebration or just want to make a complete spread, pairing it with the right accompaniments can elevate the entire experience. Because the Bubblegum Ice Cream Cake is so rich, sweet, and cool, I love serving things that offer a nice contrast or complement.
For drinks, keep it light and refreshing. Simple sparkling water with a squeeze of fresh lemon or lime cuts through the sweetness beautifully. Homemade lemonade or iced tea also makes a lovely, classic pairing that won’t compete with the cake’s unique flavor.
If you’re serving this for a kids’ party, small glasses of milk are always a perfect, nostalgic match for any ice cream treat. For other treats on the table, I suggest something savory or less sweet. A light fruit platter with fresh berries, melon, and grapes offers a wonderful palate cleanser and a refreshing contrast.
The natural tartness of fruits like raspberries or kiwi would be especially nice. You could also offer some simple, unsweetened crackers or pretzels to balance the sweetness.
For a truly fun party theme, continue the playful vibe with other whimsical touches like colorful napkins, fun party hats, and maybe even a bowl of real bubblegum for chewing after the cake! Remember, the Bubblegum Ice Cream Cake is designed to be the highlight, so let it shine, serving simple, complementary items alongside it.
FAQs
What kind of ice cream works best for this Bubblegum Ice Cream Cake?
The star of our Bubblegum Ice Cream Cake is, of course, bubblegum ice cream itself! You want a good quality brand that offers a creamy texture and vibrant color. For the vanilla layer, choose a rich, full-fat vanilla ice cream. High-quality ice cream makes all the difference in the final texture and flavor of your Bubblegum Ice Cream Cake.
Can I make this Bubblegum Ice Cream Cake ahead of time?
Absolutely, and I highly recommend it! This Bubblegum Ice Cream Cake is the ultimate make-ahead dessert. You can assemble the entire cake up to 2-3 weeks in advance.
Just make sure to wrap it very tightly in plastic wrap and then foil to prevent freezer burn. This takes all the stress out of party day!
How do I get clean slices of Bubblegum Ice Cream Cake?
For those picture-perfect slices of Bubblegum Ice Cream Cake, use a long, sharp knife. Before each cut, dip the knife in hot water for a few seconds and then wipe it dry. The warm blade slices through the ice cream much more easily, giving you clean, crisp edges every time. Repeat this process for each slice.
What if I can’t find bubblegum ice cream?
No problem at all! You can easily make your own “bubblegum” flavored ice cream. Simply soften vanilla ice cream and mix in 1 to 2 teaspoons of bubblegum extract (found in baking supply aisles or online) and a few drops of pink food coloring. This creates a fantastic alternative for your Bubblegum Ice Cream Cake.
Can I use a different type of cookie for the crust of the Bubblegum Ice Cream Cake?
Yes, definitely! While vanilla sandwich cookies provide a nice light base, you can absolutely experiment. Chocolate sandwich cookies or even graham crackers work wonderfully. Just ensure you crush them finely and mix them with melted butter as directed to create a firm crust for your Bubblegum Ice Cream Cake.
Nutrition Information (per serving)
Here’s an estimated nutritional breakdown for a single serving of our delicious Bubblegum Ice Cream Cake. Please remember that these values are approximations and can vary based on specific brands and exact quantities of ingredients used. This estimate is based on dividing the whole cake into 12 generous slices.
| Nutrient | Amount |
|---|---|
| Calories | 420 kcal |
| Total Fat | 22g |
| Saturated Fat | 14g |
| Cholesterol | 65mg |
| Sodium | 210mg |
| Total Carbohydrates | 52g |
| Dietary Fiber | 1g |
| Total Sugars | 40g |
| Protein | 4g |
Bubblegum Ice Cream Cake
This Bubblegum Ice Cream Cake is a vibrant and whimsical dessert that combines the creamy coolness of ice cream with a delightful cookie crust and playful bubblegum flavor, making it perfect for any celebration.
- Total Time: 30 mins
- Yield: 12 servings 1x
Ingredients
1 package (14.3 oz) Vanilla Sandwich Cookies
6 tablespoons Unsalted Butter
1.5 quarts Bubblegum Ice Cream
1 quart Vanilla Ice Cream
1 container (12 oz) Whipped Topping
A few drops Pink Food Coloring
1/2 cup Mini Gumballs or Bubblegum Candies
2–3 tablespoons Sprinkles
1/2 teaspoon Bubblegum Extract (optional)
Instructions
- Line a 9-inch springform pan with plastic wrap
- Crush the vanilla sandwich cookies in a food processor and transfer to a medium bowl
- Pour melted butter over cookie crumbs and mix until evenly moistened
- Press the mixture into the bottom of the springform pan and freeze for 15-20 minutes
- Spread softened bubblegum ice cream over the crust and return to the freezer for 30-45 minutes
- Spread softened vanilla ice cream over the bubblegum layer and return to the freezer for 2-3 hours or overnight
- Fold in pink food coloring into the thawed whipped topping
- Remove from freezer, lift the cake out of the pan, and spread the whipped topping over the cake
- Decorate with gumballs and sprinkles
- Slice with a hot knife and serve
Notes
Make sure the ice cream is slightly softened, not melted, for easier spreading.
Use a hot knife for clean slices.
- Prep Time: 20 mins
- Cook Time: 10 mins
- Category: Dessert
- Method: Freezing
- Cuisine: American
- Diet: Gluten Free
Nutrition
- Serving Size: 1 slice
- Calories: 420 kcal
- Sugar: 40g
- Sodium: 210mg
- Fat: 22g
- Saturated Fat: 14g
- Unsaturated Fat: 8g
- Trans Fat: 0g
- Carbohydrates: 52g
- Fiber: 1g
- Protein: 4g
- Cholesterol: 65mg
Every great recipe starts with a story, and my experience creating the Bubblegum Ice Cream Cake is no exception. If you’re curious about the whimsical inspirations behind this delightful dessert, you can learn more here.
Bubblegum Ice Cream Cake is a playful dessert that captures the vibrant essence of childhood through its fun flavors and colors. Like many desserts that evoke nostalgia, it brings smiles and joy, making it a delightful choice for any celebration. For a broader exploration of similar fun treats, check out this article on Desserts.