
Oh, the joy of a kitchen filled with laughter and the sweet scent of something truly special baking! As a mom of three, my kitchen often feels like the heart of our home, a place where memories are made and little hands eagerly help. Just last week, after a particularly busy school day, my youngest, Lily, declared she was bored.
My secret weapon for boredom? A fun kitchen project! We decided to tackle something new and exciting: a batch of chewy mochi donuts.
The idea of those uniquely airy, delightfully chewy treats had been dancing in my head for a while, ever since I saw them pop up on my feed. Crafting this chewy mochi donuts recipe with step by step instructions became our afternoon adventure. Watching their eyes light up as the dough transformed and then, finally, tasting those perfectly golden, incredibly delicious rings of joy, made all the effort worthwhile.
There’s something so satisfying about making these at home; you control the ingredients, and the freshness just can’t be beat. This isn’t just about making a snack; it’s about creating a moment, a memory, and a taste experience that truly brings smiles. Get ready to discover the magic of homemade mochi donuts – I promise you, it’s a sweet journey you’ll want to take again and again!
Why You’ll Love This Chewy Mochi Donuts Recipe (and I Know You Will!)
You are about to discover your new favorite treat! This chewy mochi donuts recipe with step by step instructions isn’t just another dessert; it is an experience. First, you will adore the unique, bouncy, and undeniably chewy texture that sets these donuts apart from anything else.
Unlike traditional cake or yeast donuts, mochi donuts offer a delightful resistance with every bite, a sensation that keeps you coming back for more. Furthermore, making them at home gives you complete control over the flavor. You can customize glazes and toppings to suit your family’s preferences.
This recipe is surprisingly straightforward, meaning even beginner bakers can achieve spectacular results. Imagine the pride in serving freshly made mochi donuts, still warm, to your loved ones. Moreover, it’s a fantastic kitchen project for kids, fostering creativity and a love for homemade treats.
This chewy mochi donuts recipe is pure joy, a simple pleasure that feels incredibly indulgent, perfect for weekend mornings or a fun afternoon activity. You will certainly appreciate how easy it is to follow this mochi donut recipe right in your own kitchen.
Ingredients You’ll Need
Gathering your ingredients is the first exciting step in creating these delightful mochi donuts. Each component plays a crucial role in achieving that signature chewy texture we all crave. You will find most of these items readily available at your local grocery store, making this chewy mochi donuts recipe with step by step instructions accessible to everyone.
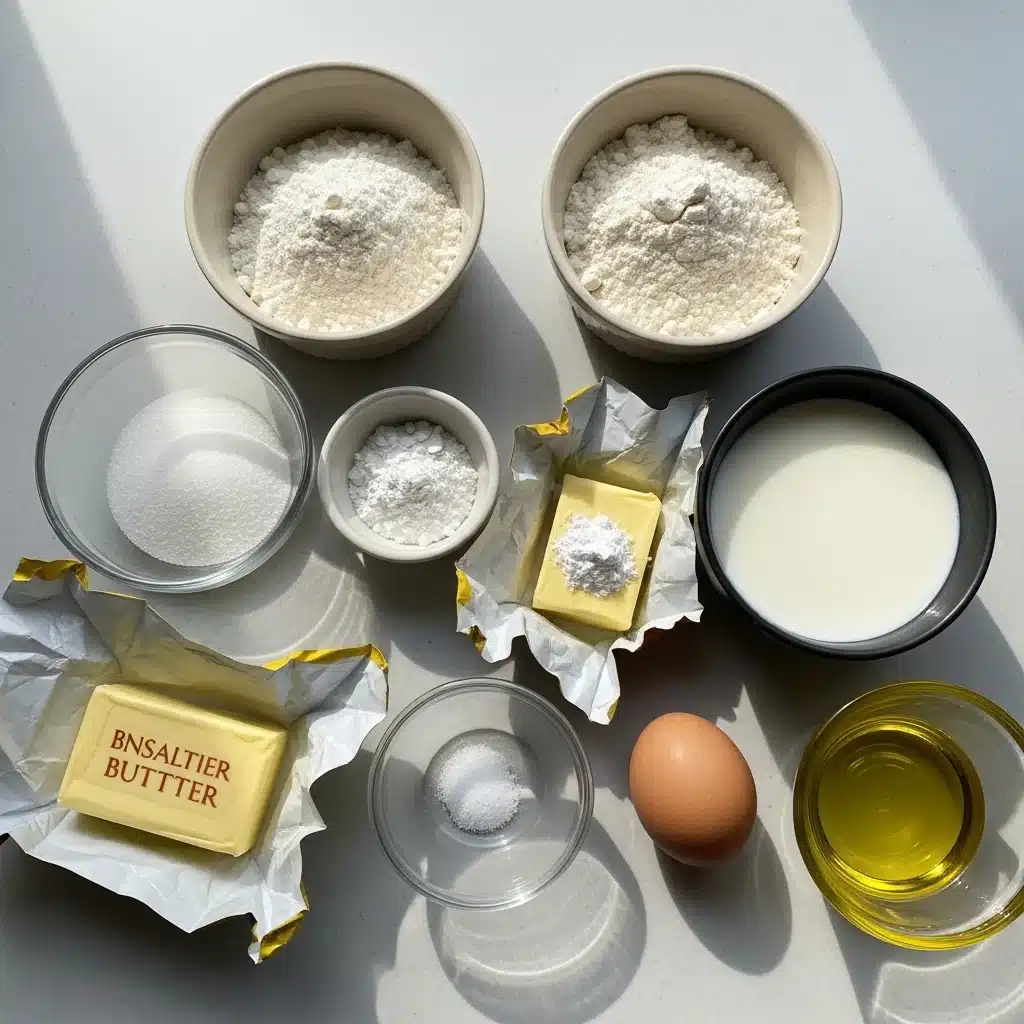
| Ingredient | Quantity | Purpose |
|---|---|---|
| Tapioca Flour (or Tapioca Starch) | 2 cups (240g) | Essential for the chewy, elastic texture. |
| All-Purpose Flour | ½ cup (60g) | Provides structure and balances the chewiness. |
| Granulated Sugar | ½ cup (100g) | Adds sweetness and helps with browning. |
| Baking Powder | 1 tablespoon | Leavening agent for a slightly airy interior. |
| Salt | ½ teaspoon | Enhances all the flavors. |
| Warm Milk (any kind) | 1 cup (240ml) | Hydrates the dough; helps create a smooth consistency. |
| Unsalted Butter, melted | ¼ cup (56g) | Adds richness and tenderness to the donuts. |
| Large Egg | 1 | Binds ingredients, adds moisture and richness. |
| Vanilla Extract | 1 teaspoon | Infuses a lovely aroma and flavor. |
| Vegetable Oil or Canola Oil | 4-6 cups | For deep frying the donuts to golden perfection. |
| Glaze Ingredients (Powdered Sugar, Milk, Vanilla) | As needed | For a sweet finishing touch. |
This careful selection of ingredients guarantees the best results for your perfect chewy mochi donuts. Now you are all set to embark on making these truly special treats.
Substitutions & Variations
One of the beautiful things about cooking at home is the freedom to customize, and this chewy mochi donuts recipe with step by step instructions is wonderfully adaptable. First, for a gluten-free option, you can experiment with a gluten-free all-purpose flour blend in place of regular all-purpose flour. Just ensure it contains xanthan gum for structure.
Additionally, for a dairy-free version, simply swap out the warm milk for any plant-based milk like almond milk or oat milk, and use a plant-based butter alternative. These substitutions work beautifully without compromising the delicious texture of the chewy mochi donuts.
Furthermore, you can play with flavors! For example, add 2 tablespoons of matcha powder to the dry ingredients for vibrant green tea mochi donuts. You might also incorporate cocoa powder for a rich chocolate version.
Moreover, the glazes offer endless possibilities. Instead of a simple vanilla glaze, try a chocolate ganache, a vibrant strawberry glaze made with freeze-dried berries, or even a lemon glaze for a zesty kick. A dusting of cinnamon sugar immediately after frying also provides a delightful coating.
Feel free to get creative with your toppings too; sprinkles, chopped nuts, toasted coconut, or even a drizzle of caramel sauce can elevate your homemade mochi donuts. Remember, this mochi donut recipe serves as a fantastic base for all your creative ideas!
If you love customizing your desserts, you’ll enjoy this chewy mochi donuts recipe that allows for gluten-free or dairy-free adaptations. For another delicious treat to try, check out Stuffed Cookie Cups with Molten Center, which also offers a fun twist on traditional baking.
Step-by-Step Instructions
Now for the fun part: making your chewy mochi donuts! Follow these easy mochi donut instructions closely, and you will soon enjoy perfectly golden, bouncy donuts.
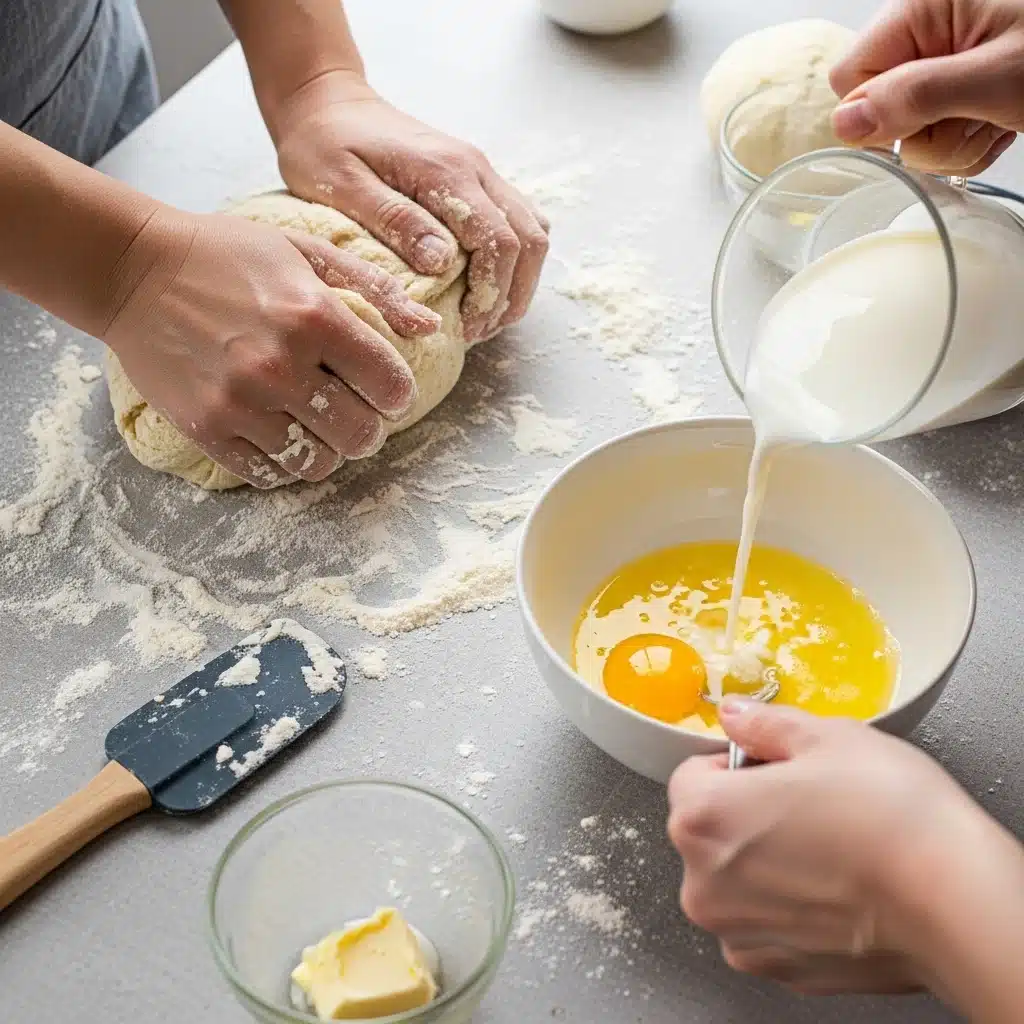
1. Prepare Your Dough: First, in a large mixing bowl, whisk together the tapioca flour, all-purpose flour, granulated sugar, baking powder, and salt. Make sure everything combines well.
In a separate medium bowl, whisk the warm milk, melted butter, egg, and vanilla extract until smooth. Pour the wet ingredients into the dry ingredients. Mix everything thoroughly with a spatula or your hands until a shaggy dough forms.
2. Knead the Dough: Turn the dough out onto a lightly floured surface. Knead for 5-7 minutes, or until the dough becomes smooth, elastic, and no longer sticky.
The texture should feel soft and pliable. This step is crucial for developing the characteristic chewiness of your chewy mochi donuts.
3.
Shape the Donuts: Next, take a small portion of dough, about 1 tablespoon, and roll it into a small ball. Repeat this process, creating 7-8 small balls for each donut. Arrange these small balls in a ring shape, pressing them gently together where they touch to form a classic mochi donut shape.
You can also form an “8” shape or any other fun design. Place the shaped donuts on parchment paper squares to prevent sticking.
4.
Heat the Oil: Fill a large, heavy-bottomed pot or Dutch oven with 4-6 cups of vegetable or canola oil, ensuring it reaches about 3 inches deep. Heat the oil over medium heat to 325-350°F (160-175°C). Use a candy thermometer to monitor the temperature; maintaining the correct oil temperature is key to success for this chewy mochi donuts recipe.
5. Fry the Donuts: Carefully lower 2-3 donuts (still on their parchment paper squares) into the hot oil. The parchment paper will naturally detach as the donuts fry; remove it with tongs.
Fry for 2-3 minutes per side, or until golden brown and puffed. The donuts should float and expand. Do not overcrowd the pot; fry in batches to maintain oil temperature.
This ensures even cooking for your chewy mochi donuts.
6. Drain and Cool: Using a slotted spoon or spider, transfer the fried donuts to a wire rack lined with paper towels to drain excess oil.
Allow them to cool slightly before glazing.
7. Prepare the Glaze: While the donuts cool, whisk powdered sugar with a tablespoon of milk and a splash of vanilla extract in a shallow bowl until smooth and of desired consistency.
Add more milk sparingly if too thick, or more powdered sugar if too thin.
8. Glaze and Serve: Dip each warm mochi donut into the glaze, letting any excess drip off.
Place them back on the wire rack for the glaze to set. Serve your incredible chewy mochi donuts immediately for the best flavor and texture! You have successfully completed this chewy mochi donuts recipe with step by step instructions.
Pro Tips for Success
Achieving the perfect chewy mochi donuts truly comes down to a few key techniques. First and foremost, do not skimp on kneading the dough. That 5-7 minutes of kneading is essential for activating the tapioca flour and developing the elasticity that gives mochi donuts their signature chew.
If your dough feels crumbly, add a tiny bit more warm milk, a teaspoon at a time, until it becomes smooth and pliable. Conversely, if it is too sticky, a little extra tapioca flour can help.
Secondly, oil temperature is absolutely critical for this mochi donut recipe. If the oil is too hot, the donuts will brown too quickly on the outside and remain raw or dense inside. If it is too cool, they will absorb too much oil, resulting in greasy donuts.
Aim for a consistent 325-350°F (160-175°C) and use a thermometer. Frying in small batches helps maintain this temperature. Additionally, when shaping your chewy mochi donuts, press the small dough balls together firmly to ensure they stick during frying.
This prevents them from breaking apart in the hot oil. Finally, glaze the donuts while they are still warm but not piping hot; this allows the glaze to melt slightly and adhere beautifully, creating a perfect finish for your chewy mochi donuts recipe with step by step instructions. These tips will guarantee your success!
Kneading is crucial for achieving that perfect chewy texture in your mochi donuts, and it requires some attention to detail. To explore more delightful treats made with careful technique, make sure to check out Fruit Pizza Recipe for another way to impress your friends and family.
Storage & Reheating Tips
Mochi donuts are always best enjoyed fresh, warm, and straight from the fryer. However, if you happen to have any leftovers from your chewy mochi donuts recipe, proper storage will help maintain their unique texture as much as possible. First, store them in an airtight container at room temperature for up to 1-2 days.
Keeping them sealed prevents them from drying out. For optimal freshness, avoid refrigerating them, as the cold can cause them to become stiff and lose their characteristic chewiness.
When you are ready to enjoy them again, reheating is simple. Pop them in a toaster oven or air fryer at 300°F (150°C) for just 3-5 minutes. This gentle reheating will bring back some of their delightful warmth and chewiness, almost like they are freshly made.
Alternatively, a quick 10-15 second zap in the microwave can also work, but be careful not to overheat, as this can make them tough. While they won’t be exactly the same as fresh, these methods will certainly make your leftover chewy mochi donuts a delicious treat once more.
What to Serve With This Recipe
These delightful chewy mochi donuts are a treat all on their own, but pairing them with the right accompaniments elevates the experience even further. First, a strong cup of coffee or a comforting mug of tea makes an ideal companion.
The slight bitterness of coffee beautifully balances the sweetness of the glaze, creating a sophisticated flavor combination. Similarly, a warm cup of green tea can highlight the subtle, unique qualities of the mochi dough, especially if you opted for a matcha variation in your mochi donut recipe.
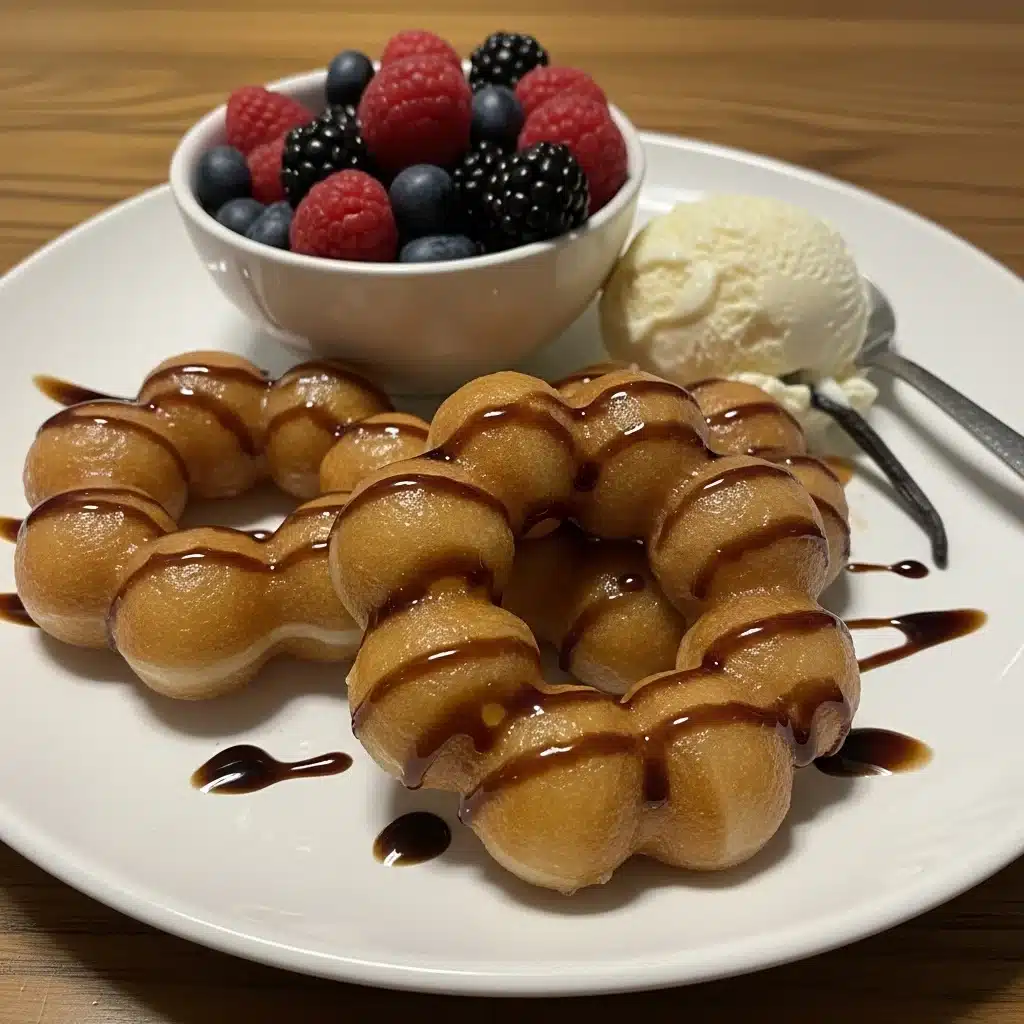
Furthermore, for a truly decadent dessert, serve your homemade mochi donuts alongside a scoop of vanilla bean ice cream. The contrast between the warm, chewy donut and the cold, creamy ice cream is simply divine. A bowl of fresh berries, such as strawberries or blueberries, also offers a light, refreshing counterpoint to the richness of the donuts.
Finally, consider a tall glass of cold milk, a classic pairing for any donut, especially these chewy mochi donuts. No matter how you choose to enjoy them, these delicious rings are sure to bring smiles. This chewy mochi donuts recipe with step by step instructions creates a versatile treat for any occasion.
These chewy mochi donuts are delightful on their own, but pairing them with the right drink can enhance your experience. To discover a unique accompaniment, be sure to look at Mango Sticky Rice Cups, which provide a wonderful contrast to the sweetness of the donuts.
FAQs
What makes mochi donuts so chewy?
The unique chewiness of mochi donuts comes primarily from tapioca flour, also known as tapioca starch. Unlike wheat flour, tapioca flour has a high starch content that creates a wonderfully elastic and bouncy texture when cooked, giving these donuts their signature mouthfeel. This is what sets our chewy mochi donuts recipe apart.
Can I bake mochi donuts instead of frying them?
While some recipes attempt to bake mochi donuts, frying is strongly recommended for the authentic texture. Baking does not achieve the same airy interior or the distinct chewiness that hot oil provides. Frying quickly cooks the exterior while allowing the inside to puff and become incredibly soft and chewy, a hallmark of our chewy mochi donuts.
How long do homemade mochi donuts last?
Homemade mochi donuts are best enjoyed on the day they are made. Their signature chewiness and fresh flavor diminish over time. You can store them in an airtight container at room temperature for up to 1-2 days, but they will start to firm up. For the best experience, savor them fresh from following this chewy mochi donuts recipe with step by step instructions.
Why are my mochi donuts not chewy?
If your mochi donuts lack chewiness, several factors could be at play. First, ensure you used enough tapioca flour; it is the star ingredient for chewiness. Secondly, proper kneading is crucial; it develops the elasticity.
Also, check your oil temperature; frying too low might result in dense, rather than chewy, donuts. Follow the mochi donut instructions carefully for optimal results.
Can I prepare the mochi donut dough ahead of time?
You can prepare the dough for this chewy mochi donuts recipe a few hours in advance. Wrap it tightly in plastic wrap and refrigerate. Before shaping and frying, let the dough come back to room temperature for about 30 minutes to make it easier to work with. This can make the making chewy mochi donuts process more convenient.
Chewy mochi donuts are an innovative twist on traditional donuts, celebrated for their unique texture derived from glutinous rice flour that gives them a delightful chew. You can learn more about these unique treats and their cultural significance in this detailed article.
Nutrition Information (per serving)
Here is an estimated nutritional breakdown for one serving of these delightful chewy mochi donuts, based on our chewy mochi donuts recipe with step by step instructions. Please remember that these values are approximations and can vary depending on specific ingredients, portion sizes, and the amount of oil absorbed during frying.
| Nutrient | Amount |
|---|---|
| Calories | 280-320 kcal |
| Total Fat | 18-22 g |
| Saturated Fat | 7-9 g |
| Cholesterol | 40-50 mg |
| Sodium | 150-180 mg |
| Total Carbohydrates | 28-32 g |
| Dietary Fiber | 0-1 g |
| Total Sugars | 14-18 g |
| Protein | 2-3 g |
Enjoy your homemade chewy mochi donuts in moderation as a delicious treat!
Print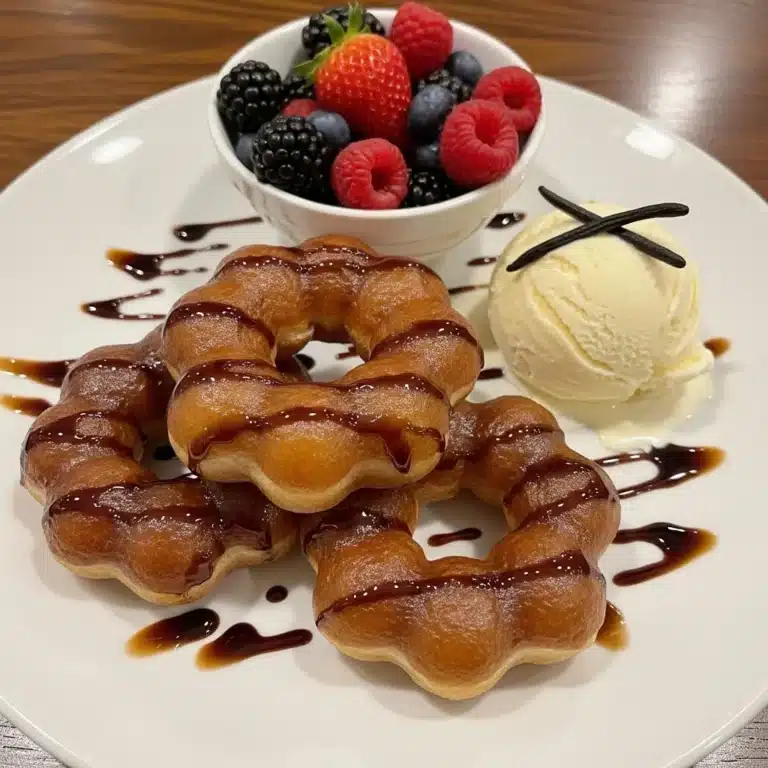
chewy mochi donuts recipe with step by step instructions
Discover the joy of homemade chewy mochi donuts with this easy recipe that combines tapioca flour for a unique chewy texture with a range of customizable glazes and toppings.
- Total Time: 30 mins
- Yield: 4 servings 1x
Ingredients
2 cups Tapioca Flour
½ cup All-Purpose Flour
½ cup Granulated Sugar
1 tablespoon Baking Powder
½ teaspoon Salt
1 cup Warm Milk
¼ cup Unsalted Butter, melted
1 Large Egg
1 teaspoon Vanilla Extract
4–6 cups Vegetable Oil or Canola Oil
As needed Glaze Ingredients (Powdered Sugar, Milk, Vanilla)
Instructions
- In a large bowl, whisk together the tapioca flour, all-purpose flour, granulated sugar, baking powder, and salt. In a separate bowl, whisk the warm milk, melted butter, egg, and vanilla extract until smooth. Mix the wet ingredients into the dry ingredients until a shaggy dough forms
- Knead the dough on a floured surface for 5-7 minutes until it is smooth and elastic
- Shape the dough into small balls and arrange them in a ring shape to form donuts
- Heat the oil in a large pot to 325-350°F (160-175°C). Fry the shaped donuts in small batches for 2-3 minutes on each side until golden brow
- Drain excess oil on paper towels and allow to cool slightly
- Prepare the glaze by mixing powdered sugar with milk and vanilla extract. Dip each warm donut into the glaze and let set
Notes
For gluten-free donuts, substitute with a gluten-free flour blend.
For dairy-free versions, use plant-based milk and butter.
- Prep Time: 20 mins
- Cook Time: 10 mins
- Category: Dessert
- Method: Frying
- Cuisine: American
- Diet: Gluten Free, Dairy Free optional
Nutrition
- Serving Size: 1 donut
- Calories: 300 kcal
- Sugar: 14 g
- Sodium: 160 mg
- Fat: 18 g
- Saturated Fat: 7 g
- Unsaturated Fat: 8 g
- Trans Fat: 0 g
- Carbohydrates: 28 g
- Fiber: 0 g
- Protein: 3 g
- Cholesterol: 40 mg