
Oh, my sweet friends, let me tell you about a little slice of heaven that often saves my sanity during busy weeks and ignites pure joy in my kids’ eyes. As a mom of three, I’m always on the hunt for delicious, nourishing, and, most importantly, *simple* recipes that bring us together. One scorching summer afternoon, the kids were begging for ice cream, but the thought of a sticky, melty mess felt overwhelming.
That’s when the idea for this incredible Banana Split Dessert (Layered No Bake) came to me. We had bananas ripening on the counter, and I envisioned a beautiful, fuss-free treat. Instead of scooping, I thought, “Why not layer?” The result was pure magic – a vibrant, creamy, and wonderfully nostalgic no-bake banana split that tasted just like our favorite diner treat, but without any actual baking!
This layered no bake banana split quickly became a cherished family tradition, perfect for impromptu celebrations or just a sweet ending to a hectic day. It’s the kind of dessert that makes everyone smile, creating happy memories with every spoonful. This is not just a recipe; it’s a little bit of love, made easy.
Why You’ll Love This Banana Split Dessert (Layered No Bake)
As a busy mom, I truly understand the need for recipes that deliver big flavor with minimal effort. This Banana Split Dessert (Layered No Bake) fits that description perfectly. You’ll absolutely adore the simplicity of this no-bake wonder.
No oven required means you can spend more time enjoying precious family moments and less time tied to a hot kitchen. This delightful layered banana dessert is incredibly easy to assemble, making it ideal for cooks of all skill levels. It’s a fantastic dessert for family gatherings, potlucks, backyard barbecues, or simply a sweet treat after a long day.
The classic banana split flavors—sweet, ripe bananas, juicy crushed pineapple, fresh strawberries, and creamy whipped topping—come alive in every single layer. This layered no bake banana split offers a delightful blend of textures, from the crunchy graham cracker crust to the smooth, luscious cream cheese filling and the soft, vibrant fruit. It’s also a wonderfully customizable dessert, allowing you to tailor it to your family’s favorite toppings and preferences.
Plus, the vibrant colors make this no bake banana split dessert an absolute showstopper on any dessert table. It offers a comforting, nostalgic flavor that practically everyone adores, bringing back childhood memories with every bite. You will discover that this Banana Split Dessert (Layered No Bake) quickly becomes a beloved staple in your dessert rotation, providing a delicious and effortless way to share a little love.
Ingredients You’ll Need
Gathering the ingredients for this Banana Split Dessert (Layered No Bake) is a breeze. Most of these items are probably already in your pantry or a quick stop at the grocery store away. We focus on fresh, simple components that come together to create something truly spectacular. Here’s what you need to create this amazing no bake banana split dessert:
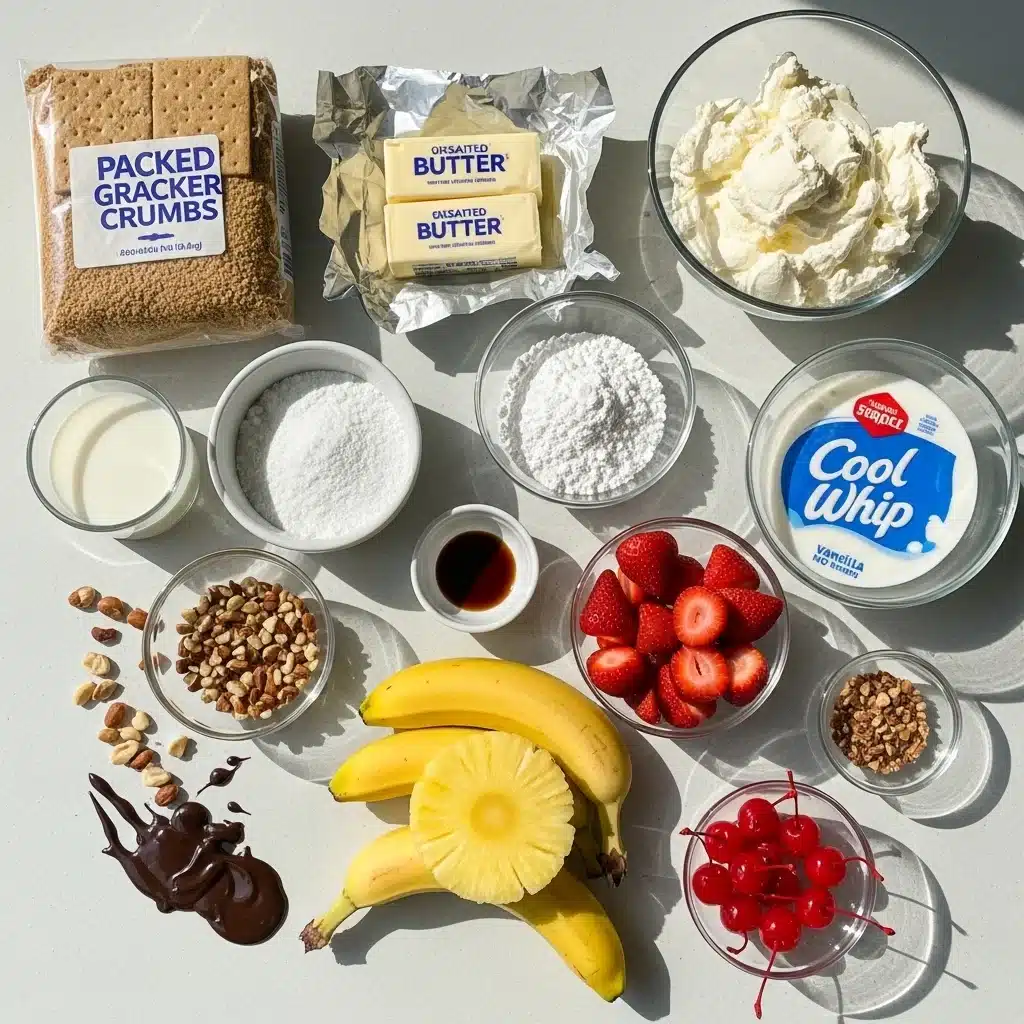
| Ingredient | Quantity | Notes |
|---|---|---|
| Graham Cracker Crumbs | 1 ½ cups | Finely crushed |
| Unsalted Butter | ½ cup (1 stick) | Melted |
| Cream Cheese | 8 oz | Softened, full-fat for best results |
| Powdered Sugar | 1 cup | Sifted to prevent lumps |
| Milk | 2 tablespoons | Any type works |
| Vanilla Extract | 1 teaspoon | Pure vanilla adds best flavor |
| Cool Whip (or homemade whipped cream) | 16 oz (2 tubs) | Thawed if using Cool Whip |
| Bananas | 4-5 medium | Ripe but firm |
| Crushed Pineapple | 1 (20 oz) can | Drained very well |
| Strawberries | 1 lb | Hulled and sliced |
| Chocolate Syrup | Optional | For drizzling |
| Chopped Nuts | Optional | Pecans or walnuts |
| Maraschino Cherries | Optional | For garnish |
Substitutions & Variations
One of the best things about this Banana Split Dessert (Layered No Bake) is its incredible flexibility. You can easily adjust it to suit your family’s preferences, dietary needs, or whatever you happen to have on hand. Don’t hesitate to get creative with your layered banana dessert!
- For the Crust: While graham cracker crumbs make a classic base, you can absolutely substitute them. Try crushed vanilla wafers, chocolate sandwich cookies (like Oreos), or even shortbread cookies for a different flavor profile. Just ensure you use the same amount of crumbs and melted butter.
- Cream Cheese Filling: For a lighter version, use reduced-fat cream cheese, though the full-fat option provides the creamiest texture. You can also experiment with a hint of almond extract instead of vanilla for a subtle flavor twist.
- Whipped Topping: Cool Whip makes this no bake banana split dessert incredibly easy, but if you prefer, you can certainly make your own homemade whipped cream. Just whip heavy cream with a little powdered sugar and vanilla until stiff peaks form.
- Fruit Options: While bananas, pineapple, and strawberries are the traditional banana split trio, feel free to swap or add other fruits. Consider sliced kiwi, blueberries, raspberries, or even mandarin oranges for a burst of different colors and flavors. Just make sure any added fruit is well-drained if it’s canned or very juicy.
- Nut-Free Version: If you have nut allergies, simply omit the chopped nuts or substitute with toasted coconut flakes for a lovely texture.
- Extra Toppings: This is where the fun truly begins! Beyond chocolate syrup and nuts, consider adding caramel sauce, sprinkles, mini chocolate chips, or even a sprinkle of toasted coconut. Each addition transforms this layered no bake banana split into a new experience.
- Dairy-Free Option: With a few strategic swaps, you can make this delicious Banana Split Dessert (Layered No Bake) dairy-free. Use dairy-free graham crackers, dairy-free cream cheese alternatives, and a plant-based whipped topping (like coconut whipped cream). This ensures everyone can enjoy a slice of this fantastic treat.
If you’re looking to mix things up with your banana dessert, consider trying a Vanilla Wafer Banana Pudding Recipe. This delightful twist adds a new flavor dimension that’s perfect for your next family gathering; check it out here.
Step-by-Step Instructions
Creating this stunning Banana Split Dessert (Layered No Bake) is simpler than you might imagine. Just follow these easy steps, and you’ll have a show-stopping dessert ready for chilling. Get ready to assemble your very own amazing layered banana dessert!
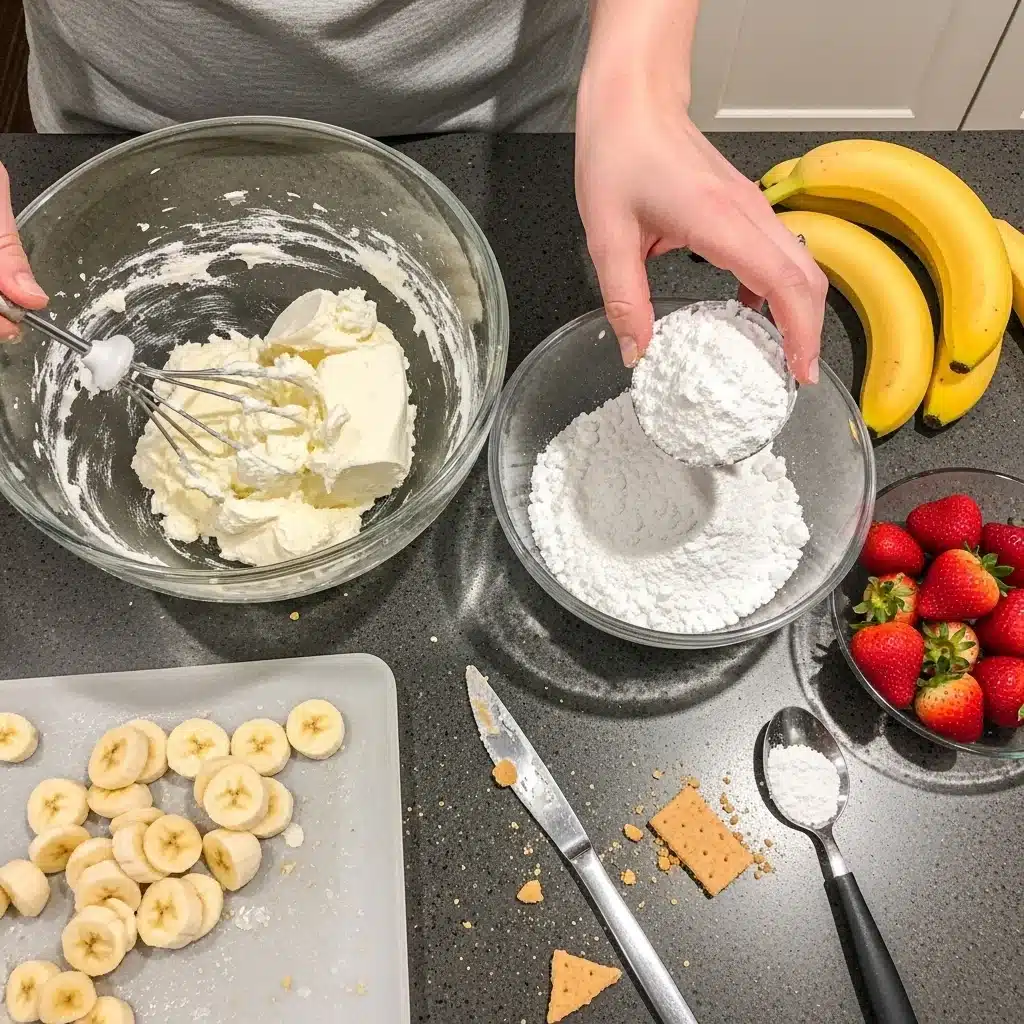
- Prepare the Crust: In a medium bowl, combine the graham cracker crumbs and melted butter. Mix thoroughly until the crumbs are evenly moistened. Press this mixture firmly into the bottom of a 9×13 inch baking dish. Use the back of a spoon or a flat-bottomed glass to ensure an even, compact layer. Place the crust in the refrigerator to chill while you prepare the filling. This helps it set.
- Make the Cream Cheese Filling: In a large mixing bowl, beat the softened cream cheese with an electric mixer until it becomes smooth and creamy. Add the powdered sugar, milk, and vanilla extract. Continue beating until the mixture is light, fluffy, and completely combined. Scrape down the sides of the bowl as needed to ensure everything incorporates well.
- Spread the Cream Cheese Layer: Carefully spread the cream cheese mixture evenly over the chilled graham cracker crust. Take your time to create a smooth, consistent layer. Place the dish back into the refrigerator to chill for at least 30 minutes. This gives the cream cheese layer a chance to firm up.
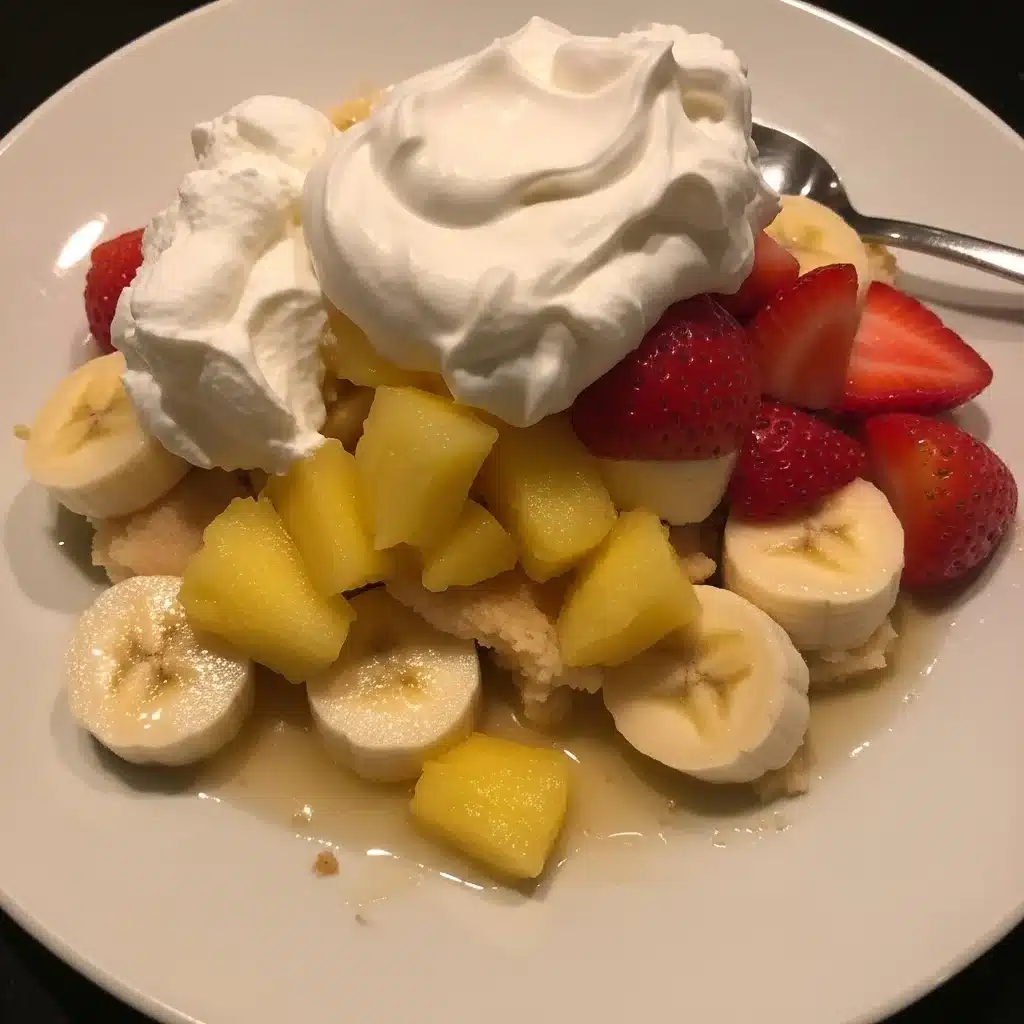
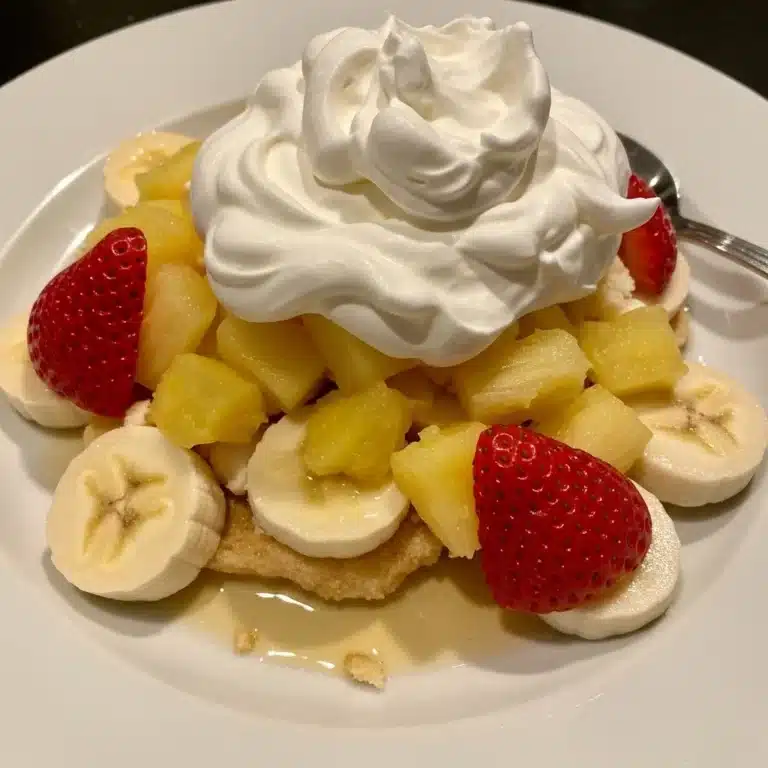
- Add the Fruit Layers: Once the cream cheese layer has chilled, it’s time for the fruit! First, arrange the sliced bananas evenly over the cream cheese layer. Next, gently spread the well-drained crushed pineapple over the bananas. Finally, arrange the sliced strawberries over the pineapple. This creates the vibrant, fresh fruit core of your Banana Split Dessert (Layered No Bake).
- Top with Whipped Topping: Gently spread the thawed Cool Whip (or homemade whipped cream) over the fruit layers, covering the entire surface of the dessert. Make sure the topping reaches the edges of the dish.
- Chill Thoroughly: This is a crucial step for any no bake banana split dessert. Cover the dish tightly with plastic wrap and refrigerate for at least 4 hours. Ideally, chill it overnight. This allows all the layers to set properly, making it easy to slice and serve. The longer it chills, the better it sets and the flavors meld.
- Garnish and Serve: Just before serving, drizzle with chocolate syrup, sprinkle with chopped nuts, and top with maraschino cherries, if desired. Cut into squares and serve this spectacular Banana Split Dessert (Layered No Bake) cold. Enjoy every delicious bite of this amazing layered banana dessert!
Pro Tips for Success
To ensure your Banana Split Dessert (Layered No Bake) turns out perfectly every single time, I’ve gathered some of my best pro tips. These little tricks make a big difference in the taste and presentation of your amazing layered no bake banana split.
- Choose the Right Bananas: Select bananas that are ripe but still firm. Overly ripe bananas can become mushy and brown quickly. Slightly green-tipped bananas will work well too, as they soften slightly over time in the dessert.
- Prevent Banana Browning: To keep your banana slices looking fresh, toss them gently in a little lemon juice (about 1-2 teaspoons for 4-5 bananas) before layering. This natural trick significantly slows down oxidation and keeps them from turning brown in your Banana Split Dessert (Layered No Bake).
- Drain Pineapple Thoroughly: This tip is crucial! Excess liquid from the crushed pineapple can make your dessert soggy. Press the pineapple firmly in a fine-mesh sieve or paper towels to remove as much juice as possible before adding it to the layers.
- Soften Cream Cheese Properly: Ensure your cream cheese is at room temperature before you start mixing. This creates a much smoother, lump-free filling that spreads easily and evenly, preventing any undesirable texture in your no bake banana split dessert.
- Don’t Skimp on Chilling Time: This dessert requires ample time to set. Chilling it for at least 4 hours, or even better, overnight, allows all the layers to firm up and prevents it from becoming a messy pile when you try to slice it. Patience truly pays off with this layered banana dessert.
- For Clean Slices: Before cutting into your chilled Banana Split Dessert (Layered No Bake), run your knife under hot water and wipe it clean between each slice. This creates neat, beautiful portions, perfect for serving.
- Layering for Presentation: When arranging the fruit, try to make even layers. For the final whipped topping, you can use an offset spatula to create pretty swirls or even pipe it with a large star tip for a more decorative finish.
- Make Ahead Advantage: This is one of those fantastic desserts that you absolutely *can* make ahead. Preparing it the day before allows the flavors to meld beautifully and ensures it’s perfectly chilled and set for serving. It’s a lifesaver for busy hosts!
To enhance the creamy texture of your Banana Split Dessert, mastering various techniques can elevate your dish. Discover my tips and tricks for perfecting desserts by reading about a fantastic Banana Ice Cream Recipe that combines simplicity and flavor here.
Storage & Reheating Tips
This Banana Split Dessert (Layered No Bake) is best enjoyed fresh and cold. As a no-bake dessert, there’s no reheating involved, which simplifies things even further! Proper storage ensures you can savor every last bite of this delightful treat.
- Refrigeration is Key: Always store any leftover Banana Split Dessert (Layered No Bake) in the refrigerator. Cover the dish tightly with plastic wrap or transfer individual slices to an airtight container. This prevents the dessert from absorbing odors from other foods and keeps it fresh.
- How Long It Lasts: This no bake banana split dessert typically stays fresh for 2-3 days in the refrigerator. After this time, the bananas may start to brown more noticeably, and the crust might soften slightly. While still safe to eat, the texture and appearance will be best within the first couple of days.
- Preventing Sogginess: The key to a non-soggy dessert lies in thoroughly draining your canned pineapple. Also, ensure your crust is pressed firmly. If you anticipate having leftovers, sometimes it’s best to add the very top layer of fresh fruit and whipped cream just before serving, although this recipe is designed to hold up well when assembled all at once.
- Freezing Not Recommended: Unfortunately, freezing this layered banana dessert is not recommended. The texture of the cream cheese filling can become grainy after thawing, and the bananas will turn very mushy and brown. It’s truly a dessert meant to be enjoyed fresh from the fridge.
- Serving Leftovers: Simply take the covered dish or individual portions directly from the refrigerator and serve cold. No fuss, no extra steps required to enjoy your delicious Banana Split Dessert (Layered No Bake) again!
What to Serve With This Recipe
Since this Banana Split Dessert (Layered No Bake) is a rich, satisfying, and complete dessert, it pairs beautifully with lighter main courses. Think about meals that won’t leave you too full, allowing you to fully appreciate every layer of this fantastic no bake banana split dessert.
- Grilled Chicken or Fish: A simple grilled chicken breast or a flaky white fish, seasoned lightly, makes an excellent precursor to this sweet treat. The freshness of the grill complements the dessert’s cool richness.
- Light Salads: Serve your main meal as a substantial salad with lean protein, like a grilled chicken Caesar salad or a vibrant Cobb salad. This leaves plenty of room for your amazing Banana Split Dessert (Layered No Bake).
- BBQ Fare: If you’re hosting a summer barbecue, this layered banana dessert is a perfect ending to classics like pulled pork sandwiches or juicy burgers. The casual vibe of a BBQ matches the easygoing nature of this dessert.
- Picnic Spreads: Pack this dessert for a picnic! It travels well once chilled. Pair it with finger foods like mini sandwiches, fresh veggie sticks with hummus, and a light pasta salad for a delightful outdoor meal.
- Simple Weeknight Dinners: For an easy family dinner, follow a quick pasta dish with a simple marinara, or even just some homemade pizza. The effort saved on the main course means more time to enjoy making and eating this delicious Banana Split Dessert (Layered No Bake).
- As a Stand-Alone Treat: Sometimes, this dessert is so good, it needs no accompaniment! Serve it for an afternoon pick-me-up or a late-night indulgence with a cup of coffee or a glass of iced tea. It’s truly a satisfying treat all on its own.
After indulging in this layered treat, consider pairing it with lighter fare to balance the meal. A great option is to try out a Cottage Cheese Banana Bread, which can offer a delightful contrast here.
FAQs
Can I make this Banana Split Dessert (Layered No Bake) ahead of time?
Absolutely! This Banana Split Dessert (Layered No Bake) is an ideal make-ahead dessert. In fact, making it the day before serving allows the flavors to meld beautifully and ensures all the layers are perfectly set and chilled. Just cover it tightly and refrigerate.
How do I keep the bananas from browning in this no bake banana split dessert?
To prevent bananas from browning, gently toss the sliced bananas in a small amount of lemon juice (about 1-2 teaspoons for 4-5 bananas) before layering them into the dessert. This simple trick helps preserve their fresh color and taste in your layered banana dessert.
Is this Banana Split Dessert (Layered No Bake) gluten-free?
As written, the recipe is not gluten-free due to the graham cracker crust. However, you can easily make it gluten-free by substituting gluten-free graham crackers or using a gluten-free cookie crumb alternative for the crust. This modification allows everyone to enjoy this fantastic no bake banana split dessert.
Can I use different fruits in this layered banana dessert?
Yes, you certainly can! While bananas, pineapple, and strawberries are traditional, you can easily swap or add other fruits like sliced kiwi, blueberries, raspberries, or mandarin oranges. Just make sure any canned fruit is very well-drained to avoid making the dessert watery.
What kind of whipped topping works best for this Banana Split Dessert (Layered No Bake)?
Thawed frozen whipped topping (like Cool Whip) works wonderfully for its stability and ease of use. However, you can definitely use homemade whipped cream if you prefer. Just whip heavy cream with a little powdered sugar and vanilla until stiff peaks form for your amazing layered no bake banana split.
How long does this no bake banana split dessert last in the fridge?
This Banana Split Dessert (Layered No Bake) will last for 2-3 days in the refrigerator when covered tightly. After this time, the bananas may start to brown, and the crust might soften more, affecting the overall texture and appearance.
Layered desserts often bring nostalgia and fun to the table, and no treat embodies this better than the layered no-bake banana split. Dessert lovers can explore more about the history and variations of this delightful treat through a delectable link.
Nutrition Information (per serving)
Here’s an estimated nutritional breakdown for one serving of this delicious Banana Split Dessert (Layered No Bake). Please remember that these values are approximate and can vary based on specific brands, exact measurements, and any substitutions or additions you make to your no bake banana split dessert.
| Nutrient | Amount (approx.) |
|---|---|
| Calories | 380 kcal |
| Total Fat | 20g |
| Saturated Fat | 12g |
| Cholesterol | 40mg |
| Sodium | 200mg |
| Total Carbohydrates | 45g |
| Dietary Fiber | 2g |
| Total Sugars | 30g |
| Protein | 4g |
Banana Split Dessert (Layered No Bake)
This Banana Split Dessert (Layered No Bake) is a simple and delicious treat that combines layers of graham cracker crust, cream cheese filling, fresh fruit, and whipped topping. It's perfect for family gatherings, potlucks, or a sweet ending to a busy day.
- Total Time: 4 hours 20 mins
- Yield: 12 servings 1x
Ingredients
1 ½ cups Graham Cracker Crumbs
½ cup Unsalted Butter
8 oz Cream Cheese
1 cup Powdered Sugar
2 tablespoons Milk
1 teaspoon Vanilla Extract
16 oz Cool Whip
4–5 medium Bananas
1 (20 oz) can Crushed Pineapple
1 lb Strawberries
Optional: Chocolate Syrup
Optional: Chopped Nuts
Optional: Maraschino Cherries
Instructions
- Prepare the Crust: Combine graham cracker crumbs and melted butter. Press into the bottom of a 9×13 inch baking dish
- Make the Cream Cheese Filling: Beat softened cream cheese until smooth. Add powdered sugar, milk, and vanilla extract; mix until fluffy
- Spread the Cream Cheese Layer: Spread the cream cheese mixture over the crust and chill for 30 minutes
- Add the Fruit Layers: Layer sliced bananas, crushed pineapple, and sliced strawberries on top of the cream cheese layer
- Top with Whipped Topping: Spread Cool Whip over the fruit layers
- Chill Thoroughly: Cover tightly and refrigerate for at least 4 hours or overnight
- Garnish and Serve: Drizzle with chocolate syrup, add chopped nuts, and top with cherries just before serving
Notes
Select bananas that are ripe but firm to prevent browning.
Drain pineapple thoroughly to avoid sogginess in the dessert.
For a lighter version, use reduced-fat cream cheese.
- Prep Time: 20 mins
- Cook Time: 0 mins
- Category: Dessert
- Method: No Bake
- Cuisine: American
- Diet: Vegetarian
Nutrition
- Serving Size: 1 slice
- Calories: 380 kcal
- Sugar: 30 g
- Sodium: 200 mg
- Fat: 20 g
- Saturated Fat: 12 g
- Unsaturated Fat: 8 g
- Trans Fat: 0 g
- Carbohydrates: 45 g
- Fiber: 2 g
- Protein: 4 g
- Cholesterol: 40 mg