One particularly chaotic Tuesday afternoon, I found myself in a classic mom dilemma. School pick-up was a whirlwind, soccer practice loomed, and my youngest, Leo, had declared it “dessert emergency day.” We’d just devoured dinner, and the cries for something sweet were echoing through the kitchen. Now, usually, a full-sized cheesecake is a labor of love, a weekend project, not a Tuesday night spontaneous creation.
But I had a secret weapon, one that always saves the day and brings smiles to tired faces: my recipe for individual Cheesecake Cups.
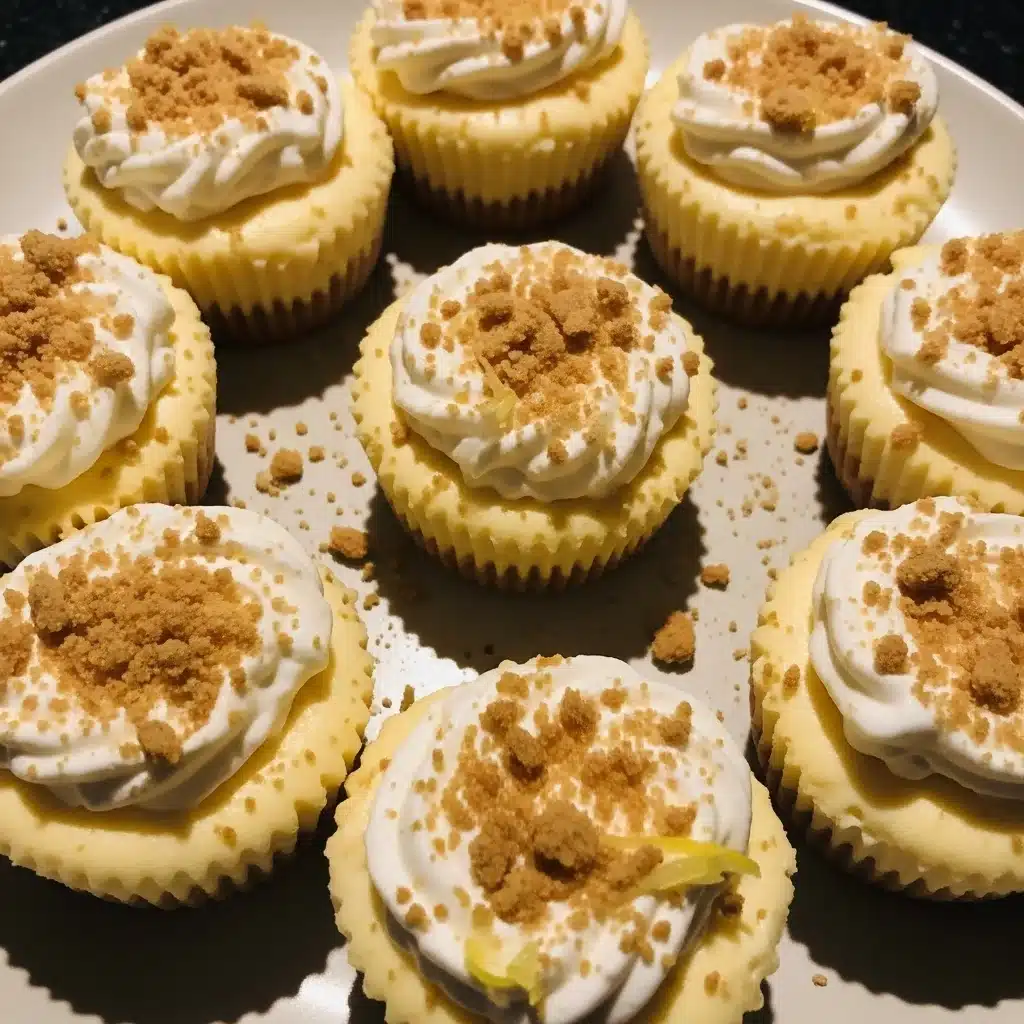
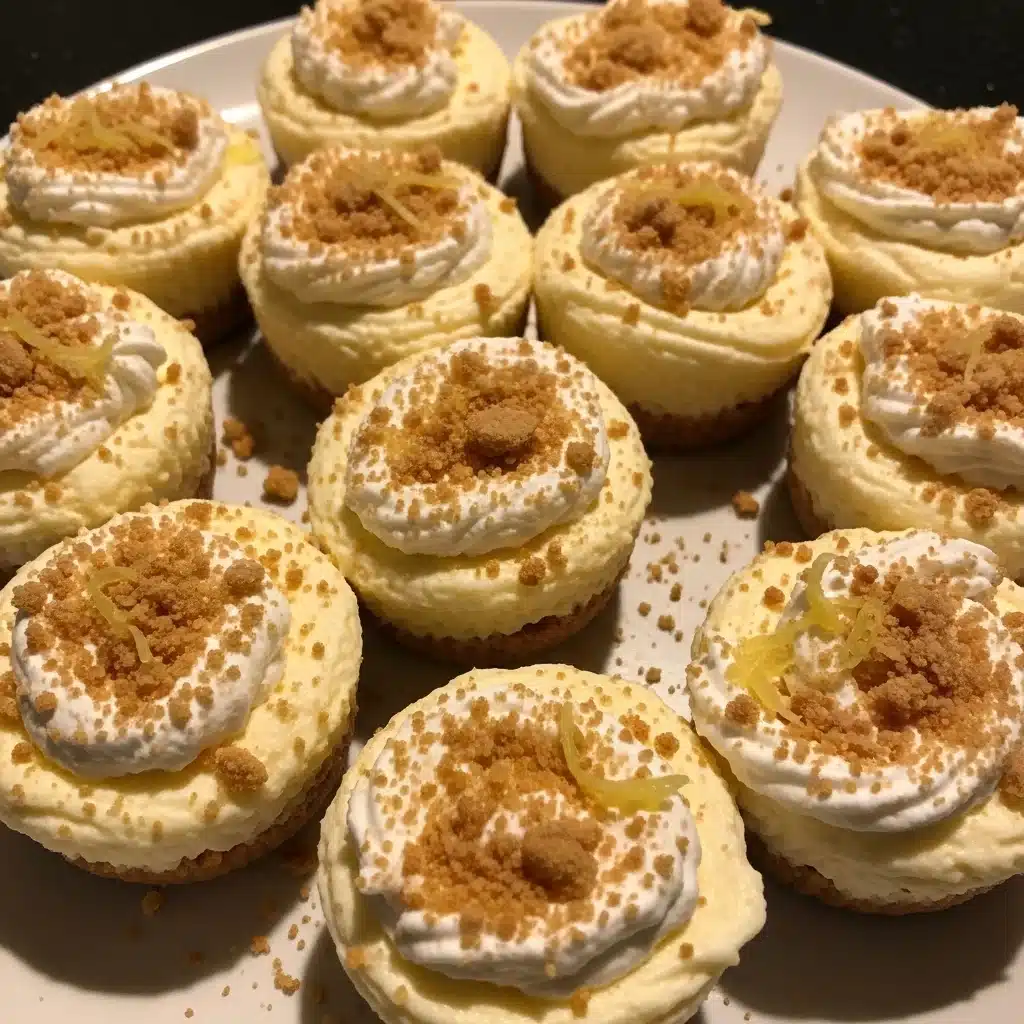
These aren’t just any mini cheesecakes; they’re perfectly portioned, delightfully creamy, and so much quicker to make than their larger counterpart. That day, I whipped up a batch of these glorious little treats in what felt like no time, and the pure joy on my kids’ faces as they each picked their own tiny dessert was priceless.
From that moment on, these easy Cheesecake Cups became a staple in our home, proof that even on the busiest days, you can still infuse a little bit of magic and a lot of love into your family’s life. They are simple, elegant, and absolutely irresistible. Trust me, these are the Cheesecake Cups you’ve been looking for.
Why You’ll Love These Amazing Cheesecake Cups
These delightful Cheesecake Cups are more than just a dessert; they are a solution to so many everyday challenges. First, their individual size is pure genius. No more messy slicing or fighting over who gets the biggest piece.
Each person enjoys their own perfectly portioned Cheesecake Cup. They are also incredibly versatile. You can easily adapt them for different dietary needs or flavor preferences.
Furthermore, these mini cheesecake treats are much quicker to bake than a traditional large cheesecake, significantly cutting down on your oven time. This makes them ideal for busy weeknights or spontaneous gatherings. Plus, the creamy texture and rich flavor of these homemade Cheesecake Cups will truly impress everyone, yet they require minimal effort.
They offer all the luxurious taste of a classic cheesecake in a convenient, charming package. You will simply adore making and sharing these wonderful little Cheesecake Cups.
Ingredients You’ll Need
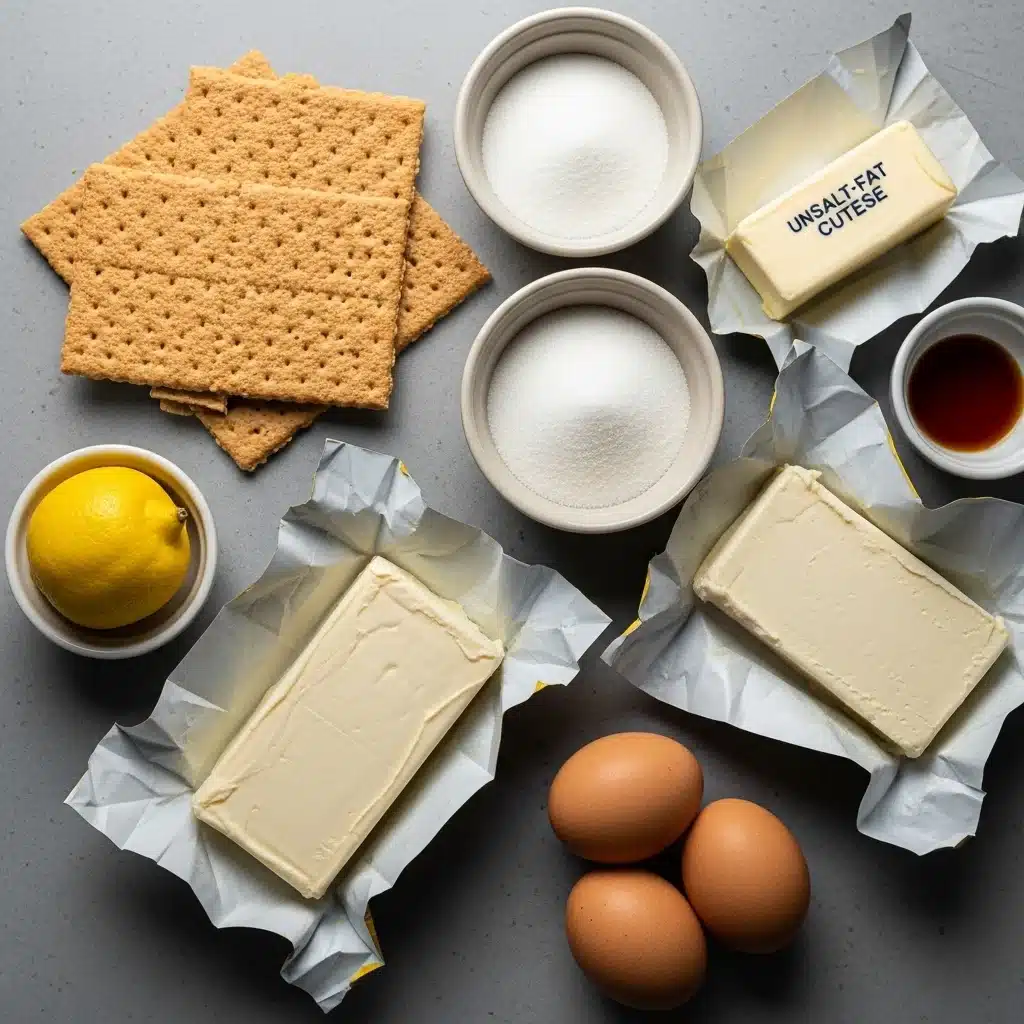
Making these fantastic Cheesecake Cups requires just a few basic ingredients you likely already have in your pantry and fridge. I always make sure to use full-fat cream cheese for the best, most decadent results. Don’t skimp on quality here! Fresh lemon juice brightens the flavor beautifully.
| Quantity | Ingredient |
|---|---|
| 1 ½ cups | Graham cracker crumbs (about 10-12 full sheets) |
| ¼ cup | Granulated sugar (for crust) |
| 6 tablespoons | Unsalted butter, melted |
| 2 (8-ounce) packages | Full-fat cream cheese, softened |
| ¾ cup | Granulated sugar (for filling) |
| 1 teaspoon | Vanilla extract |
| ½ teaspoon | Lemon zest (optional, but recommended) |
| 1 tablespoon | Fresh lemon juice |
| 2 large | Eggs, at room temperature |
Substitutions & Variations
The beauty of these Cheesecake Cups lies in their adaptability. You can truly make them your own!
* Crust Alternatives: Instead of graham crackers, try crushed Biscoff cookies, Oreo cookies (for a chocolate cheesecake cup!), shortbread cookies, or even gluten-free cookie crumbs. You can also mix in a pinch of cinnamon or nutmeg for extra warmth.
* Cream Cheese: While full-fat cream cheese offers the best texture, you can use Neufchâtel cheese for a slightly lighter version.
Avoid fat-free options; they often yield a rubbery texture.
* Sweetener: For the filling, you can reduce the sugar slightly if you prefer a less sweet dessert. Some people enjoy using a mix of granulated sugar and a touch of brown sugar for a deeper flavor.
* Flavor Boosters:
* Lemon Lovers: Increase the lemon zest and juice for an extra zingy lemon cheesecake cup.
* Chocolate Dreams: Swirl in melted chocolate (milk, dark, or white) into the filling before baking. You can also add mini chocolate chips.
* Berry Burst: Mix in ½ cup of fresh or frozen (thawed and drained) berries like raspberries, blueberries, or chopped strawberries into the filling.
* Fall Flavors: Add a teaspoon of pumpkin pie spice and a few tablespoons of pumpkin puree to the filling for a seasonal twist on your Cheesecake Cups.
* Coffee Kick: Dissolve a teaspoon of instant espresso powder in a tablespoon of hot water and mix it into the cream cheese filling.
* Nutty Goodness: Sprinkle chopped nuts like pecans or walnuts over the crust before pressing it down.
* Topping Ideas: This is where the real fun begins! Fresh berries, fruit compote, whipped cream, chocolate sauce, caramel sauce, chopped nuts, a dusting of cocoa powder, or even a simple sprinkle of colored sprinkles make excellent toppings for your individual Cheesecake Cups. You can even make a small batch of cherry pie filling for classic cherry Cheesecake Cups.
Step-by-Step Instructions
Creating these delightful Cheesecake Cups is surprisingly simple. Just follow these steps, and you will have perfect mini cheesecakes every time.
1. Prepare Your Pan: First, preheat your oven to 325°F (160°C). Then, line a 12-cup muffin tin with paper liners.
This step makes removing your baked Cheesecake Cups incredibly easy.
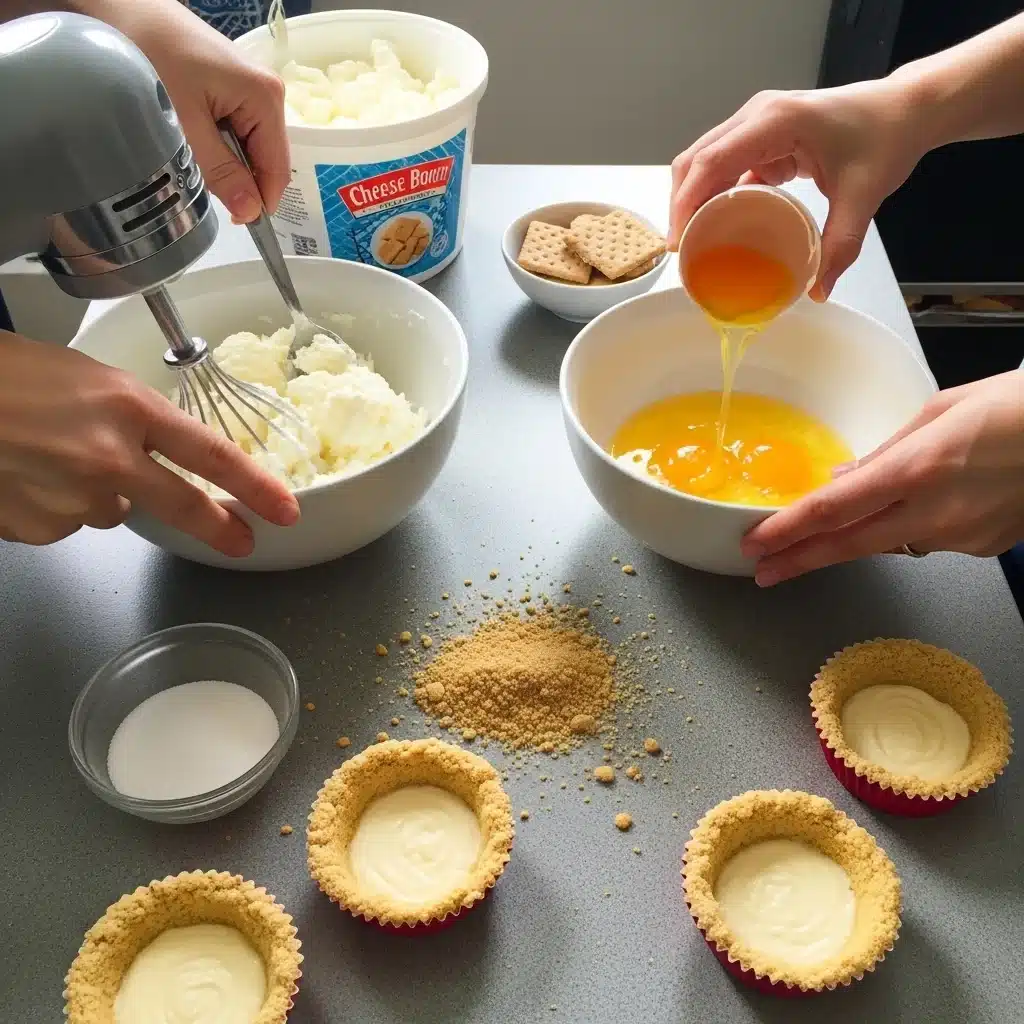
2. Make the Crust: In a medium bowl, combine the graham cracker crumbs and ¼ cup of granulated sugar.
Pour in the melted butter and mix well until the crumbs are thoroughly moistened. You want it to resemble wet sand.
3.
Press the Crust: Distribute the graham cracker mixture evenly among the 12 muffin cups. Use the bottom of a small glass or your fingers to firmly press the mixture into a compact layer at the bottom of each liner. This creates a solid base for your Cheesecake Cups.
4. Bake the Crust (Optional but Recommended): Bake the crusts for 5 minutes. This helps set them and prevents them from becoming soggy.
Remove from the oven and let them cool slightly while you prepare the filling.
5. Prepare the Filling: In a large bowl, using an electric mixer, beat the softened cream cheese on medium speed until smooth and creamy.
Make sure there are no lumps.
6. Add Sweetener and Flavor: Gradually add ¾ cup of granulated sugar to the cream cheese, beating until just combined.
Stir in the vanilla extract, lemon zest (if using), and lemon juice. Continue mixing until everything is fully incorporated into your smooth cheesecake base for the Cheesecake Cups.
7.
Incorporate Eggs: Add the eggs one at a time, beating on low speed *just until combined* after each addition. Be careful not to overmix the batter once the eggs are in, as this can lead to cracks in your finished Cheesecake Cups. Overmixing incorporates too much air.
8. Fill the Cups: Pour or spoon the cheesecake batter evenly over the cooled crusts in each muffin cup. Fill each liner about ¾ full.
9. Bake the Cheesecake Cups: Place the muffin tin in the preheated oven. Bake for 18-22 minutes, or until the edges are set but the centers still have a slight jiggle when you gently shake the pan.
Do not overbake! This is crucial for creamy Cheesecake Cups.
10.
Cool and Chill: Remove the muffin tin from the oven. Let the Cheesecake Cups cool completely in the tin on a wire rack. Once they reach room temperature, transfer the entire tin to the refrigerator.
Chill for at least 3-4 hours, or ideally overnight, before serving. Chilling allows the individual cheesecakes to fully set and develop their rich flavor and texture.
11.
Serve: Carefully remove the Cheesecake Cups from the muffin tin and peel off the paper liners. Top with your favorite garnishes and enjoy your perfectly portioned dessert!
Pro Tips for Success
Achieving perfect Cheesecake Cups every time involves a few simple tricks. These tips will elevate your baking game and ensure wonderfully creamy, crack-free mini cheesecakes.
* Room Temperature Ingredients are Key: Always ensure your cream cheese and eggs are at room temperature. This helps them mix smoothly and prevents lumps in your batter. Cold ingredients will make your cheesecake lumpy and potentially overbeaten.
* Don’t Overmix the Batter: When beating the cream cheese, mix until smooth. However, once you add the eggs, beat *just until combined*. Overmixing incorporates too much air, which can cause your Cheesecake Cups to puff up excessively in the oven and then sink or crack as they cool.
Gentle mixing after adding eggs is paramount.
* The Water Bath Secret (Optional): For an even creamier texture and to prevent cracking, you can place your muffin tin inside a larger baking pan. Fill the larger pan with about an inch of hot water before placing it in the oven.
This creates a steamy environment that bakes the Cheesecake Cups more gently. If you use this method, wrap the bottom of your muffin tin with foil to prevent water seepage.
* Watch for the Jiggle: Don’t rely solely on baking time.
Your Cheesecake Cups are done when the edges look set, but the very center still has a slight, subtle jiggle. They will continue to set as they cool. Overbaking leads to dry, cracked cheesecakes.
* Cool Gradually: Resist the urge to pull your Cheesecake Cups out of the oven immediately and place them in the fridge. Allow them to cool slowly on the counter first. This gradual cooling prevents drastic temperature changes that can cause cracking.
* Chill Thoroughly: Chilling is non-negotiable for these Cheesecake Cups. They need at least 3-4 hours in the refrigerator (or overnight) to fully set up, firm up, and allow the flavors to meld beautifully. Patience here truly pays off.
* Loosen the Liners: Once chilled, gently twist each paper liner to loosen it from the pan before attempting to peel it off the individual cheesecake. This makes for a clean release.
Storage & Reheating Tips
These delightful Cheesecake Cups store beautifully, making them perfect for meal prepping desserts or enjoying over several days.
* Refrigeration: Store your baked and chilled Cheesecake Cups in an airtight container in the refrigerator for up to 3-5 days. To prevent them from absorbing odors or drying out, make sure the container is sealed tightly.
* Freezing: Cheesecake Cups freeze exceptionally well!
To freeze, first make sure they are completely chilled and firm. Place them on a baking sheet (without liners, if possible) and freeze for about an hour until solid. Then, transfer the frozen Cheesecake Cups to a freezer-safe airtight container or freezer bag.
Separate layers with parchment paper to prevent sticking. They will keep well for up to 1-2 months.
* Thawing: When you’re ready to enjoy a frozen Cheesecake Cup, simply transfer it from the freezer to the refrigerator and let it thaw overnight, or for several hours.
You can also let it sit at room temperature for 30-60 minutes for a quicker thaw, though the texture will be best when slowly thawed in the fridge. Do not attempt to microwave or “reheat” these; they are meant to be enjoyed cold.
What to Serve With This Recipe
These versatile Cheesecake Cups are a fantastic dessert on their own, but pairing them with certain complements can elevate the experience even further. They truly shine with a variety of accompaniments.
* Fresh Berries: A simple handful of fresh raspberries, blueberries, or sliced strawberries adds a burst of freshness, color, and a lovely tart contrast to the creamy sweetness of the Cheesecake Cups.
* Whipped Cream: A dollop of homemade whipped cream, lightly sweetened with a touch of vanilla, is a classic and elegant pairing. It adds another layer of creamy texture.
* Fruit Compote or Sauce: A warm berry compote (made from simmered berries, sugar, and a squeeze of lemon) or a vibrant raspberry coulis makes a sophisticated topping. Caramel sauce or chocolate ganache also work wonderfully for a richer treat.
* Coffee or Tea: Serve these lovely individual cheesecakes with a freshly brewed cup of coffee, an espresso, or your favorite herbal tea.
The slight bitterness of coffee particularly complements the sweetness of the Cheesecake Cups.
* Dessert Wine: For an adult gathering, a small glass of dessert wine, like a late-harvest Riesling or a Moscato d’Asti, pairs beautifully with the rich, creamy texture of the Cheesecake Cups.
* Ice Cream: A small scoop of vanilla bean ice cream on the side creates a delightful hot-cold contrast, especially if you’re serving these after a meal.
* Mint Sprig: A fresh mint sprig isn’t just for garnish; its refreshing aroma adds a subtle lift to each bite of your Cheesecake Cups.
FAQs
Can I make these Cheesecake Cups gluten-free?
Absolutely! Simply substitute gluten-free graham crackers or other gluten-free cookie crumbs for the crust. The filling ingredients are naturally gluten-free, so no other changes are necessary for these delicious Cheesecake Cups.
My Cheesecake Cups cracked on top. What went wrong?
Cracking usually occurs from overbaking or sudden temperature changes. To prevent this, don’t overmix the batter (especially after adding eggs), watch for that slight jiggle in the center, and allow them to cool gradually on the counter before chilling. A water bath can also help. Remember, even with a small crack, your Cheesecake Cups will still taste amazing!
How far in advance can I make these mini cheesecakes?
You can prepare these Cheesecake Cups up to 2-3 days in advance and store them in an airtight container in the refrigerator. This makes them an ideal make-ahead dessert for parties or busy weeks. You can even freeze them for longer storage, as detailed in the storage section.
Can I skip the crust baking step?
Yes, you can skip baking the crust. However, baking the crust for a few minutes helps it set more firmly and prevents it from becoming soggy from the filling. If you skip it, ensure you press the crust mixture very firmly into the bottom of the liners.
Nutrition Information (per serving)
*(Values are approximate and can vary based on specific ingredients and brands used)*
| Nutrient | Amount |
|---|---|
| Calories | 310 kcal |
| Total Fat | 22g |
| Saturated Fat | 13g |
| Cholesterol | 95mg |
| Sodium | 210mg |
| Total Carbohydrates | 25g |
| Dietary Fiber | 0.5g |
| Total Sugars | 20g |
| Protein | 5g |

Cheesecake Cups
These delightful Cheesecake Cups are easy to make, perfectly portioned, and a hit with everyone. They are creamy, rich, and can be customized to various flavor profiles, making them a versatile treat for any occasion.
- Total Time: 4 hours 42 mins
- Yield: 12 servings 1x
Ingredients
1 ½ cups Graham cracker crumbs
¼ cup Granulated sugar (for crust)
6 tablespoons Unsalted butter, melted
2 (8-ounce) packages Full-fat cream cheese, softened
¾ cup Granulated sugar (for filling)
1 teaspoon Vanilla extract
½ teaspoon Lemon zest (optional)
1 tablespoon Fresh lemon juice
2 large Eggs, at room temperature
Instructions
- Preheat your oven to 325°F (160°C) and line a 12-cup muffin tin with paper liners
- In a medium bowl, combine the graham cracker crumbs and ¼ cup of granulated sugar. Pour in the melted butter and mix well
- Distribute the graham cracker mixture evenly among the 12 muffin cups and press it into a compact layer
- Bake the crusts for 5 minutes and let them cool slightly
- In a large bowl, using an electric mixer, beat the softened cream cheese until smooth
- Gradually add ¾ cup of granulated sugar to the cream cheese and mix, then stir in the vanilla extract, lemon zest, and lemon juice
- Add the eggs one at a time, mixing only until combined after each additio
- Pour the cheesecake batter evenly over the cooled crusts, filling each liner about ¾ full
- Bake for 18-22 minutes until the edges are set but the centers have a slight jiggle
- Let the cheesecake cups cool completely in the tin, then chill in the refrigerator for at least 3-4 hours
- Carefully remove the cheesecakes from the muffin tin and top with your favorite garnishes
Notes
Using room temperature ingredients helps ensure a smooth mixture.
Avoid overmixing after adding the eggs to prevent cracks in the cheesecakes.
- Prep Time: 20 mins
- Cook Time: 22 mins
- Category: Dessert
- Method: Baking
- Cuisine: American
- Diet: Gluten Free
Nutrition
- Serving Size: 1 cup
- Calories: 310 kcal
- Sugar: 20g
- Sodium: 210mg
- Fat: 22g
- Saturated Fat: 13g
- Unsaturated Fat: 9g
- Trans Fat: 0g
- Carbohydrates: 25g
- Fiber: 0.5g
- Protein: 5g
- Cholesterol: 95mg
If you ever find yourself in a dessert dilemma, you might want to explore these delightful treats. The joy they bring can truly transform any chaotic moment, just like a visit to The Best Dessert Ideas.
Cheesecake Cups are a delightful twist on traditional cheesecake, offering individual servings that cater to everyone’s preferences. These mini desserts are perfect for gatherings or an easy treat at home, making them a popular choice for many dessert lovers. For more on cheesecakes, you can read about them in this overview of cheesecakes.