Growing up, my kitchen was always the heart of our home. It buzzed with laughter, the clatter of pots, and the comforting aroma of whatever deliciousness my mom was whipping up. Now, as a mom of three myself, I strive to create that same warm, loving atmosphere for my own children.
For me, food isn’t just sustenance; it’s a hug, a memory, and a way to show affection. That’s why I’m so excited to share one of our absolute favorite dessert discoveries with you: the incredible burnt Basque cheesecake. I first stumbled upon this recipe during a quiet evening, yearning for something truly special, yet simple enough for a busy weeknight.
The idea of a cheesecake that embraced a beautifully caramelized, almost charred exterior while remaining sumptuously creamy inside captivated me instantly. It seemed almost rebellious, breaking all the traditional cheesecake rules! My kids, initially skeptical about the “burnt” part, were completely won over by the first bite.
Now, it’s a requested treat for birthdays, special occasions, or just because we need a little extra sweetness in our lives. If you’ve ever wondered how to make burnt Basque cheesecake at home, you’re in for a delightful journey. This isn’t a fussy, perfect-looking dessert; its charm lies in its rustic elegance and its unbelievably smooth texture.
Forget water baths and crack-free tops. This cake thrives on high heat and a little bit of beautiful imperfection. Today, I’m going to walk you through every step of mastering burnt Basque cheesecake, proving that gourmet desserts don’t have to be complicated. Let’s dive into making burnt Basque cheesecake at home, a recipe that will surely become a cherished part of your family’s table too.
Why You’ll Love This Simple Burnt Basque Cheesecake Recipe
You’ll quickly fall in love with making burnt Basque cheesecake at home for so many reasons. First, its simplicity is a dream come true for any home baker. No fancy equipment is necessary, and you won’t deal with the usual fussiness of traditional cheesecakes.
This recipe actively embraces a high baking temperature, which eliminates the need for a water bath – hallelujah! Second, the flavor profile is utterly unique. The deeply caramelized, almost bitter crust perfectly balances the rich, creamy, and slightly sweet interior.
It’s an explosion of textures and tastes in every bite. Third, it’s a showstopper. Despite its straightforward preparation, a perfectly baked burnt Basque cheesecake looks incredibly impressive, making it ideal for entertaining or simply treating your family to something extraordinary.
Finally, it’s versatile. You can serve it plain or with a simple topping, and it always delivers pure joy. Learning how to make burnt Basque cheesecake at home means bringing a touch of gourmet elegance to your kitchen without any stress.
Ingredients You’ll Need
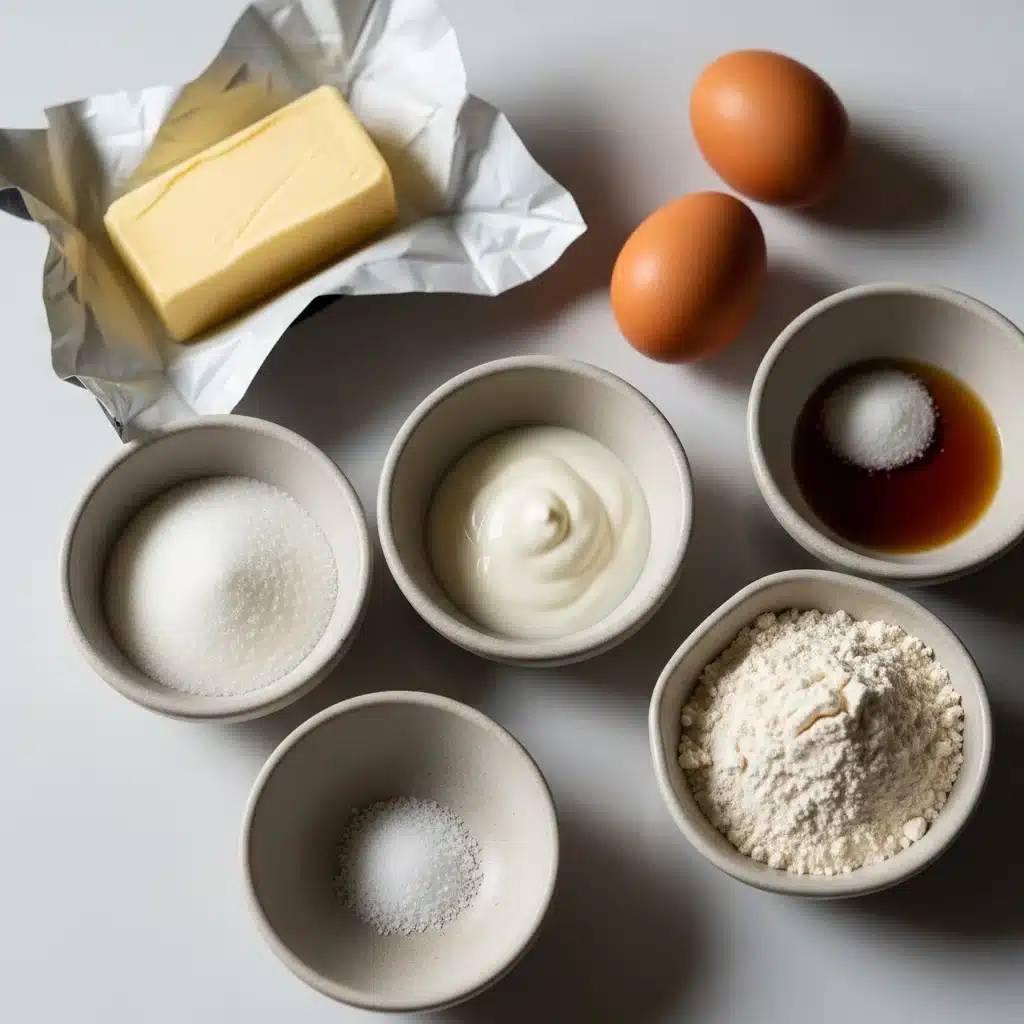
Gathering your ingredients for making burnt Basque cheesecake at home is straightforward. You only need a few high-quality components to achieve that signature flavor and texture. Ensure your cream cheese and eggs are at room temperature; this promotes a smooth, lump-free batter.
| Ingredient | Quantity | Notes |
|---|---|---|
| Full-Fat Cream Cheese | 32 oz (4 blocks) | Room temperature, crucial for a smooth batter. Use good quality! |
| Granulated Sugar | 1 ½ cups | Sweetens without overpowering. |
| Large Eggs | 6 | Room temperature, adds richness and structure. |
| Heavy Cream | 2 cups | Full-fat for ultimate creaminess. |
| All-Purpose Flour | 1 tablespoon | Just a touch for stability; sifting prevents lumps. |
| Vanilla Extract | 1 teaspoon | Enhances the overall flavor. |
| Fine Sea Salt | ½ teaspoon | Balances sweetness and deepens flavors. |
Substitutions & Variations
One of the beautiful things about learning how to make burnt Basque cheesecake at home is its adaptability. While I always recommend starting with the classic recipe, don’t hesitate to experiment once you’re comfortable.
* Cream Cheese: While full-fat cream cheese is best for that signature richness, you can experiment with a portion of mascarpone for an even more luxurious texture. Avoid low-fat cream cheese, as it can affect the set and flavor.
* Sugar: For a slightly different flavor profile, you could swap out a quarter cup of granulated sugar for brown sugar, adding a subtle caramel note.
However, stick mostly to granulated sugar to allow the ‘burnt’ notes to shine.
* Flavorings:
* Citrus Zest: Add 1-2 teaspoons of orange or lemon zest to the batter for a bright, refreshing lift.
* Coffee: Incorporate 1-2 teaspoons of instant espresso powder dissolved in a tablespoon of hot cream for a subtle mocha twist.
* Liqueur: A tablespoon or two of Grand Marnier, Amaretto, or Kahlua can add a sophisticated touch. Add it with the vanilla extract.
* Gluten-Free Option: Simply substitute the all-purpose flour with a 1:1 gluten-free baking flour blend.
The small amount of flour means this substitution works very well.
* Smaller Servings: To make smaller burnt Basque cheesecakes, divide the batter into individual ramekins or a smaller springform pan (adjusting baking time accordingly).
Remember, the core method of how to make burnt Basque cheesecake at home remains the same, but these variations allow you to customize it to your taste!
One of the beautiful things about learning how to make burnt Basque cheesecake at home is its adaptability. While I always recommend starting with the classic recipe, don’t hesitate to experiment once you’re comfortable. You might also want to check out How to Freeze Peaches for a delicious fruit accompaniment!
Step-by-Step Instructions
Let’s get to the good part: actually preparing burnt Basque cheesecake. Don’t be intimidated; the process is surprisingly forgiving. The key is to trust the high heat!
1. Prepare Your Pan: Preheat your oven to a blazing 400°F (200°C). Line a 9-inch springform pan with two sheets of parchment paper.
Ensure the paper extends well above the rim of the pan. This provides protection for the edges during the high-heat bake and creates that signature rustic look. Seriously, don’t skimp on the parchment; it helps achieve that beautiful “burnt” exterior without charring the cake itself.
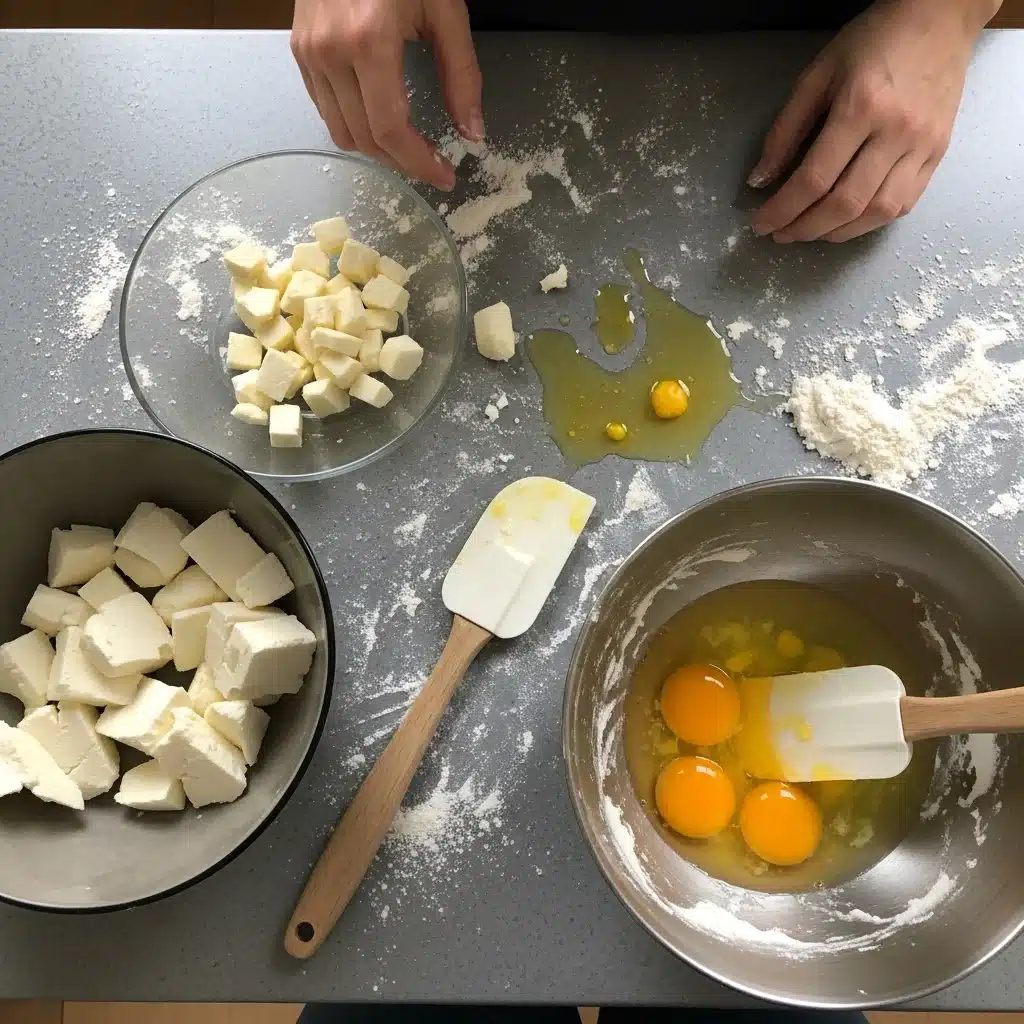
2. Soften Cream Cheese: In a large mixing bowl, beat the room temperature cream cheese with an electric mixer on medium speed until completely smooth and creamy. This can take a few minutes.
Scrape down the sides of the bowl frequently. This crucial step prevents lumps in your finished product.
3.
Add Sugar: Gradually add the granulated sugar to the cream cheese, beating until well combined and light and fluffy. Continue to beat for about 2-3 minutes to incorporate air.
4.
Incorporate Eggs: Add the eggs one at a time, beating well after each addition until just combined. Do not overmix at this stage; overmixing can introduce too much air, which can cause the cheesecake to puff up excessively and then fall dramatically.
5.
Stir in Cream and Flavorings: Pour in the heavy cream, vanilla extract, and sea salt. Mix on low speed until just combined.
6.
Add Flour: Sift the all-purpose flour over the batter. Gently fold it in with a spatula until no dry streaks remain. This small amount of flour helps prevent the cake from being *too* gooey and gives it just enough structure.
7. Pour and Bake: Pour the smooth batter into your prepared springform pan. Place the pan on a baking sheet to catch any potential drips (though with proper parchment lining, this is rare).
Transfer it to the preheated oven.
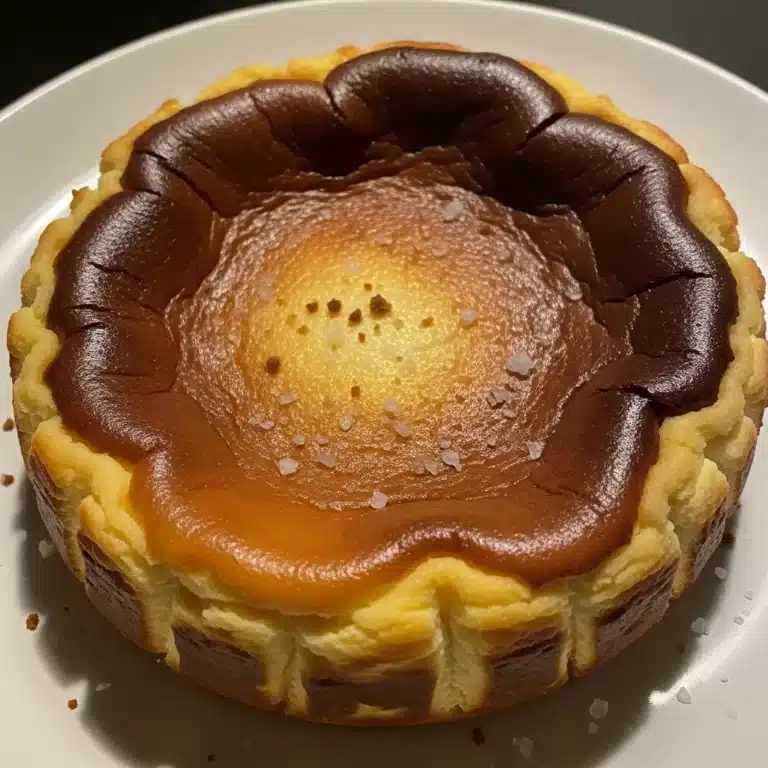
8. The “Burnt” Bake: Bake for 50-60 minutes.
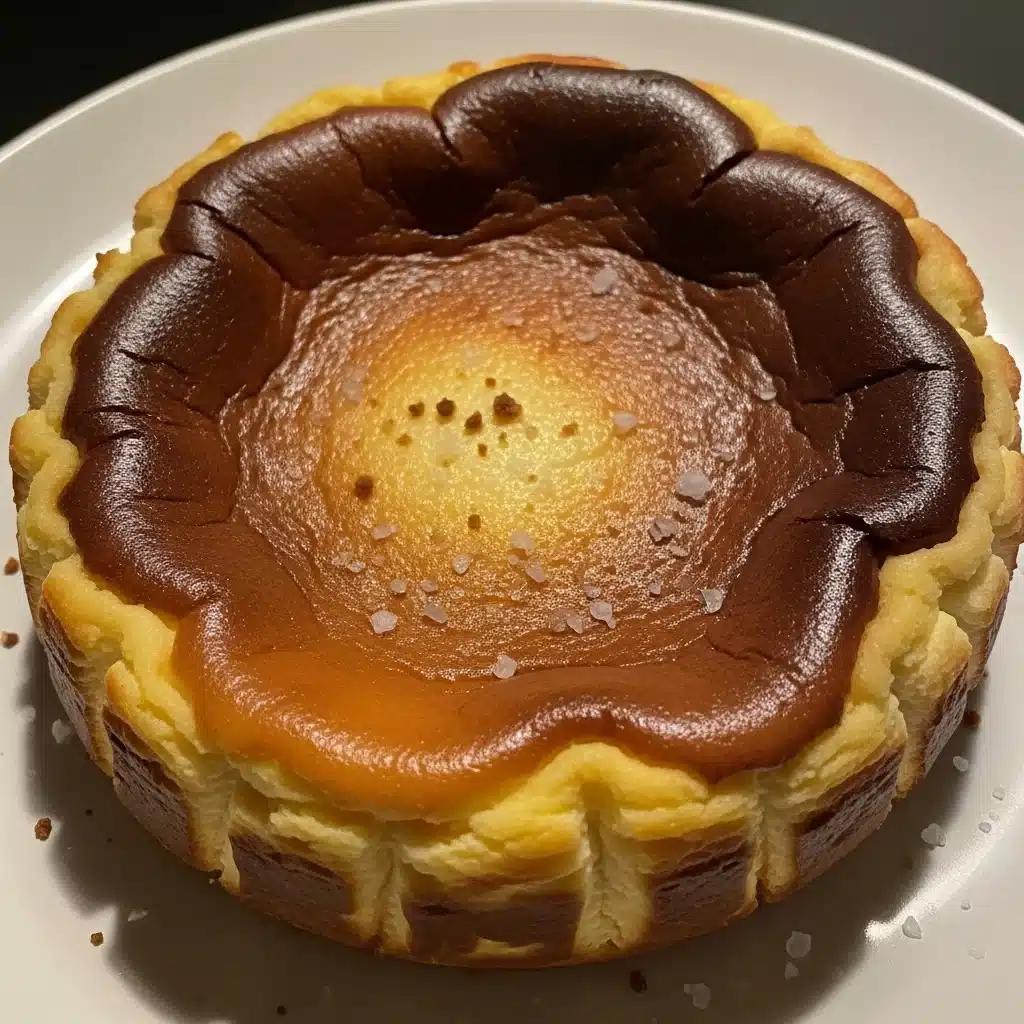
The top should be deeply golden brown, almost blackened in spots, and the center should still be quite jiggly when you gently shake the pan. Don’t worry about it looking “burnt” – that’s the whole point! This intense heat creates the iconic caramelized exterior.
When you see that beautiful dark top, you know you are successfully learning how to make burnt Basque cheesecake at home.
9. Cool and Chill: Remove the cheesecake from the oven and let it cool completely on a wire rack at room temperature.
It will deflate significantly as it cools – this is normal and expected! Once cool, transfer the cheesecake (still in its pan) to the refrigerator and chill for at least 4 hours, or preferably overnight. Chilling is essential for the cheesecake to fully set and achieve its creamy texture.
10. Serve: Once thoroughly chilled, remove the cheesecake from the springform pan. Gently peel away the parchment paper.
Slice and serve! Now you know how to make burnt Basque cheesecake at home and enjoy every delicious bite.
Pro Tips for Success
To ensure your homemade burnt Basque cheesecake turns out perfectly every time, keep these expert tips in mind. Following these will make your journey of how to make burnt Basque cheesecake at home even smoother.
* Room Temperature Ingredients are Key: This cannot be stressed enough, especially for the cream cheese and eggs. Cold ingredients will result in a lumpy batter and a less smooth finished texture. Plan ahead!
* Don’t Overmix: While you want your cream cheese and sugar to be smooth, be careful not to overmix once the eggs are added. Overmixing incorporates too much air, leading to a soufflé-like rise and then a more significant fall and potential cracks. Mix until just combined.
* Embrace the Parchment: Use two sheets of parchment paper for proper coverage. Crumple them up before lining the pan; this makes them much easier to fit snugly into the springform pan and encourages those charming, crinkled edges.
* Trust the Heat: Don’t be afraid of that high oven temperature!
It’s what gives this cheesecake its characteristic “burnt” crust and incredible flavor. The top should look dark, almost black in spots.
* Jiggle is Good: When you pull the cheesecake from the oven, the center should still have a noticeable jiggle, like unset custard.
It will continue to cook and set as it cools. If it’s completely firm, it’s likely overbaked.
* Chill Completely: Patience is a virtue here.
Chilling the cheesecake for at least 4-6 hours, or ideally overnight, is crucial for it to set properly and develop its signature dense, creamy interior. Trying to slice it warm will result in a gooey mess.
* Clean Slices: For perfectly clean slices, use a sharp knife dipped in hot water and wiped clean between each cut.
This creates those beautiful, defined edges that make your homemade burnt Basque cheesecake even more appealing. Master these tips, and you will excel at how to make burnt Basque cheesecake at home.
To ensure your homemade burnt Basque cheesecake turns out perfectly every time, keep these expert tips in mind. Following these will make your journey of how to make burnt Basque cheesecake at home even smoother, and consider pairing it with a refreshing drink like How to Make Detox Drink for Summer? A Refreshing Guide.
Storage & Reheating Tips
One of the great things about making burnt Basque cheesecake at home is how well it stores, making it a fantastic make-ahead dessert!
* Storage: Store any leftover burnt Basque cheesecake in an airtight container in the refrigerator for up to 4-5 days. You can also cover the springform pan tightly with plastic wrap once it’s completely cooled.
* Freezing: This cheesecake freezes wonderfully!
Wrap individual slices or the entire cooled cheesecake tightly in plastic wrap, then an additional layer of aluminum foil. Freeze for up to 1 month.
* Thawing/Reheating: Thaw frozen slices in the refrigerator overnight.
There’s no need to reheat this cheesecake; it’s best served chilled or at room temperature. The creamy texture truly shines when it’s cool. Avoid microwaving, as it can alter the texture.
What to Serve With This Recipe
The beauty of burnt Basque cheesecake lies in its ability to stand alone as a magnificent dessert. Its rich flavor and creamy texture need very little accompaniment. However, a few simple additions can elevate the experience even further.
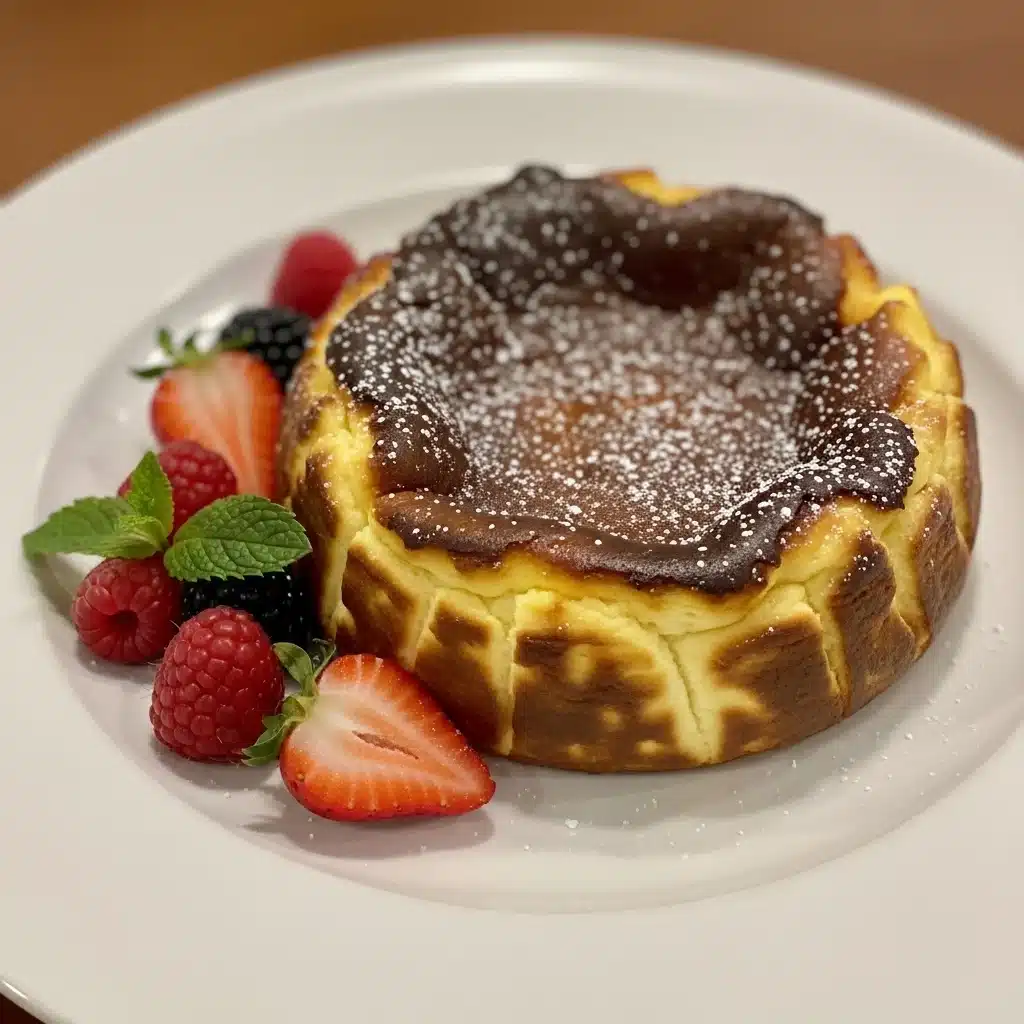
* Fresh Berries: A simple scattering of fresh raspberries, strawberries, or blueberries provides a lovely contrast in color and a hint of natural acidity that cuts through the richness of the cheesecake.
* A Dusting of Powdered Sugar: For an elegant touch, a light dusting of powdered sugar just before serving adds a delicate sweetness and a pretty finish.
* A Drizzle of Honey or Maple Syrup: A thin ribbon of high-quality honey or pure maple syrup can enhance the caramelized notes already present in the “burnt” crust.
* A Dollop of Whipped Cream: Lightly sweetened whipped cream offers a cloud-like texture contrast and a touch more indulgence.
* Coffee or Espresso: A strong cup of coffee or a shot of espresso is a classic pairing, as its bitterness beautifully complements the cheesecake’s sweetness and creaminess.
* Dessert Wine: A glass of a sweet dessert wine, like a Sauternes or a late-harvest Riesling, can be an exquisite pairing for adults.
Regardless of what you choose, remember that the star is your expertly made burnt Basque cheesecake. Enjoy the fruits of learning how to make burnt Basque cheesecake at home!
The beauty of burnt Basque cheesecake lies in its ability to stand alone as a magnificent dessert. However, a few simple additions can elevate the experience even further, such as understanding how to make a delightful chocolate treat with How to Make Dubai Chocolate Bar: A Step-by-Step Guide (2025).
FAQs
Making a new recipe always brings questions. Here are some common queries about how to make burnt Basque cheesecake at home.
Why is my burnt Basque cheesecake not burnt enough?
The “burnt” aspect comes from very high oven heat. Ensure your oven is accurately preheated to 400°F (200°C) and that you bake it long enough. Every oven is different, so it might take a bit longer in yours. Don’t be afraid of the dark, almost blackened top – that’s what makes it authentic!
My cheesecake cracked, what went wrong?
Cracking is actually less common with Basque cheesecake than with traditional cheesecakes because it doesn’t use a water bath and embraces imperfection. If it does crack significantly, you might have overmixed the batter, incorporating too much air, or possibly overbaked it slightly, causing it to dry out and crack as it cools. Either way, a cracked burnt Basque cheesecake still tastes amazing!
Can I make burnt Basque cheesecake ahead of time?
Absolutely! This cheesecake is an excellent make-ahead dessert. It needs significant chilling time anyway, so preparing it a day or even two in advance allows the flavors to meld and the texture to fully set. Store it in the refrigerator, covered.
What if I don’t have a springform pan?
While a springform pan is ideal for easy release and presentation, you could use a regular round cake pan (9-inch). You’ll need to line it very thoroughly with parchment paper, leaving plenty of overhang on all sides, to help you lift the cheesecake out once it’s chilled. It might not look as perfectly rustic on the sides, but it will still taste incredible.
Is burnt Basque cheesecake gluten-free?
As written, this recipe contains a small amount of all-purpose flour. However, you can easily make it gluten-free by substituting the all-purpose flour with a 1:1 gluten-free baking flour blend. The small quantity means it won’t impact the texture significantly. Now you have all the answers for how to make burnt Basque cheesecake at home!
Creating a burnt Basque cheesecake at home is an engaging culinary challenge that highlights the beauty of simplicity and flavor. This dessert has gained popularity for its unique texture, which combines a creamy interior with a beautifully caramelized surface, making it a lovely addition to any gathering or personal treat. For a deeper dive into cheesecakes, explore the flavors and varieties of these desserts through this informative Cheesecake page.
Nutrition Information (per serving)
While we indulge in the deliciousness of burnt Basque cheesecake, it’s good to have an idea of the nutritional breakdown. This information is an estimate based on 12 servings per cheesecake and is meant as a general guide.
| Nutrient | Amount (approx.) |
|---|---|
| Calories | 550 kcal |
| Total Fat | 45g |
| Saturated Fat | 27g |
| Cholesterol | 200mg |
| Sodium | 300mg |
| Total Carbohydrates | 30g |
| Dietary Fiber | 0g |
| Total Sugars | 25g |
| Protein | 10g |
how to make burnt Basque cheesecake at home
A delightfully burnt Basque cheesecake that embraces a beautifully caramelized exterior while remaining creamy inside. This dessert is simple to prepare and perfect for any occasion.
- Total Time: 80 mins
- Yield: 12 servings 1x
Ingredients
32 oz Full-Fat Cream Cheese
1 ½ cups Granulated Sugar
6 Large Eggs
2 cups Heavy Cream
1 tablespoon All-Purpose Flour
1 teaspoon Vanilla Extract
½ teaspoon Fine Sea Salt
Instructions
- Preheat your oven to 400°F (200°C) and line a 9-inch springform pan with parchment paper
- In a large mixing bowl, beat the cream cheese on medium speed until smooth
- Gradually add the granulated sugar and beat until light and fluffy
- Add the eggs one at a time, beating well after each additio
- Mix in the heavy cream, vanilla extract, and sea salt on low speed until just combined
- Sift the flour over the batter and gently fold it in until no dry streaks remai
- Pour the batter into the prepared springform pan and place it on a baking sheet
- Bake for 50-60 minutes until the top is deeply golden brown and the center is still jiggly
- Let the cheesecake cool on a wire rack, then chill in the refrigerator for at least 4 hours
- Remove from pan, slice, and serve
Notes
Ensure all ingredients are at room temperature for a smooth batter.
The top should look dark and caramelized; that's the intended appearance!
- Prep Time: 20 mins
- Cook Time: 60 mins
- Category: Dessert
- Method: Baking
- Cuisine: Spanish
- Diet: Gluten Free (with substitution)
Nutrition
- Serving Size: 1 slice
- Calories: 550 kcal
- Sugar: 25g
- Sodium: 300mg
- Fat: 45g
- Saturated Fat: 27g
- Unsaturated Fat: 0g
- Trans Fat: 0g
- Carbohydrates: 30g
- Fiber: 0g
- Protein: 10g
- Cholesterol: 200mg