Life with three lively kids often feels like a beautiful whirlwind. Between school pickups, soccer practice, and deciphering the latest TikTok dances, finding time for anything elaborate in the kitchen can feel impossible. Yet, as a mom who believes food is love, I always want to offer my family something special, a little moment of joy on a plate.
That’s where the magic of these incredible Mini Desserts Cups comes in. I remember one particularly hectic Tuesday; I had promised the kids a treat, but my energy reserves were running on fumes. Instead of reaching for a store-bought option, I decided to whip up some simple, individual dessert cups.
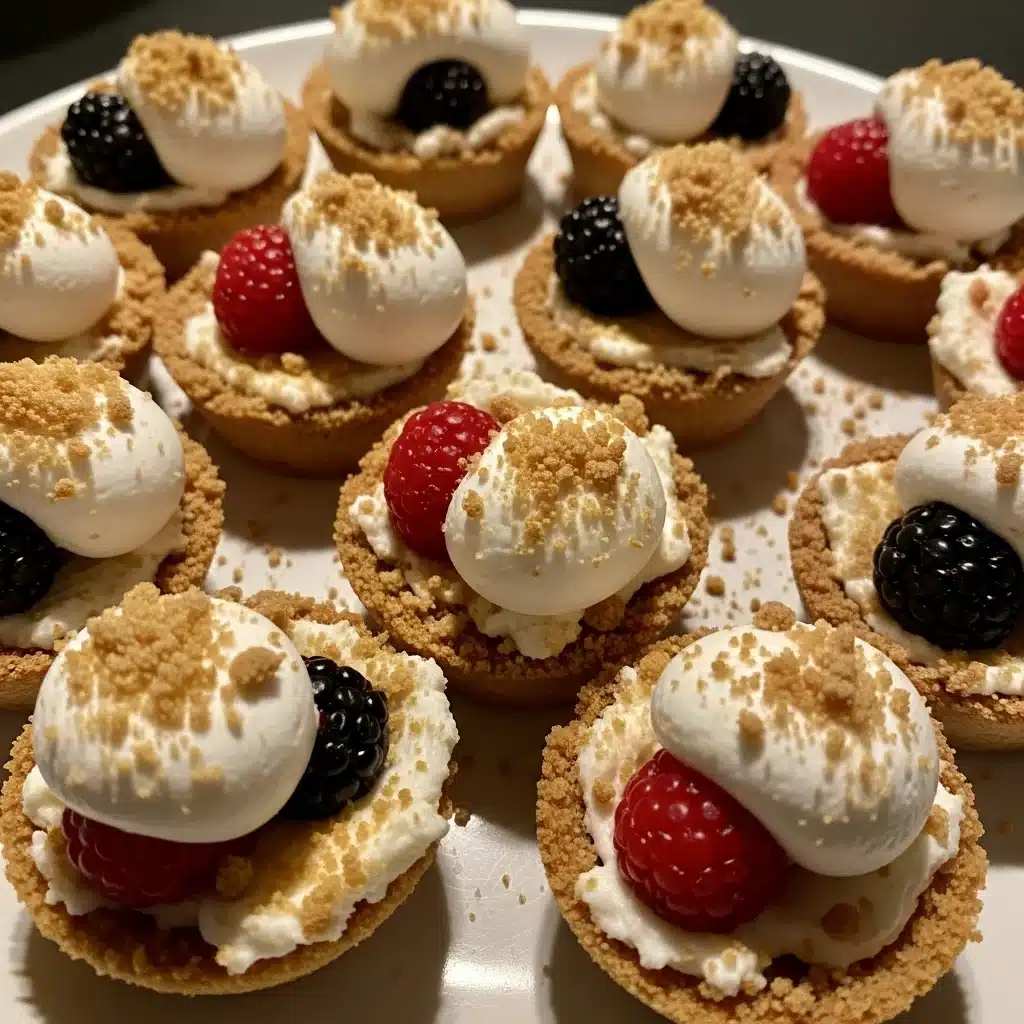
The kids’ eyes lit up when they saw their own personal dessert! No sharing battles, no giant cake knife required, just perfect, portion-controlled bliss. These delightful individual dessert cups quickly became a family favorite, a testament to how simple ingredients and a little creativity can create something truly memorable. Today, I’m sharing our go-to recipe for the most adorable and delicious Mini Desserts Cups, perfect for any occasion, or just because it’s Tuesday.
Why You’ll Love These Mini Desserts Cups
These Mini Desserts Cups are an absolute game-changer in your kitchen, I promise! First, they offer incredible convenience. No need to bake a whole cake or pie.
These individual dessert cups are ready in a flash, and most of the work is no-bake, which is a huge win on busy days. Next, think about portion control. Each person gets their own perfectly sized serving, which is fantastic for managing sweet cravings and avoiding waste.
Furthermore, these beautiful mini dessert cups are endlessly customizable. You can swap out fruits, experiment with different crusts, or change the filling to suit everyone’s taste buds. They’re a crowd-pleaser at potlucks, birthday parties, or even quiet family dinners.
Plus, serving these elegant mini desserts cups makes you look like a culinary superstar with minimal effort. They are visually appealing and simply irresistible. You will adore how simple yet impressive these individual dessert cups are.
Ingredients You’ll Need
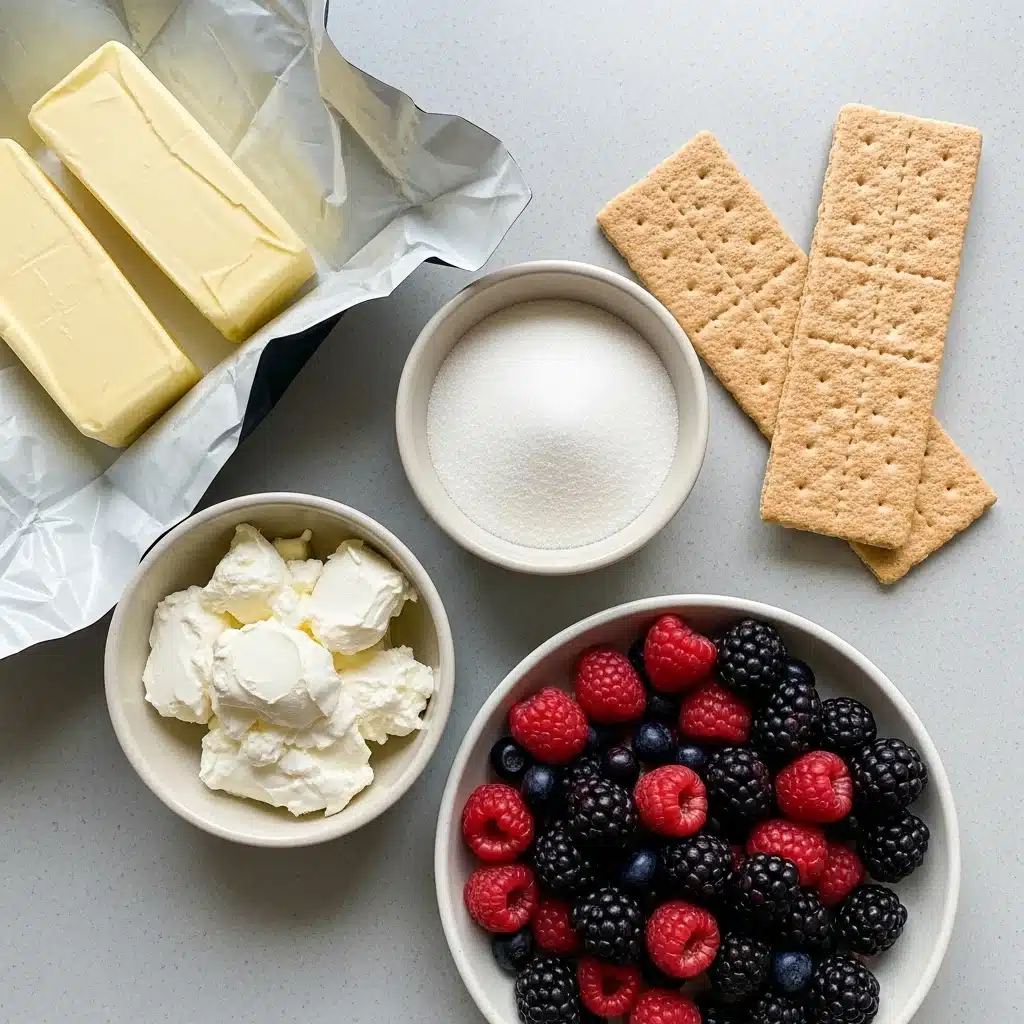
Crafting these wonderful Mini Desserts Cups requires a handful of simple, wholesome ingredients you likely already have on hand. We focus on fresh flavors and easy assembly for these delightful individual dessert cups.
| Ingredient | Quantity | Notes |
|---|---|---|
| Graham cracker crumbs | 1 ½ cups | About 10-12 full sheets |
| Melted unsalted butter | ½ cup (1 stick) | Binds the crust together |
| Granulated sugar | ¼ cup | For the crust |
| Cream cheese, softened | 16 oz (2 blocks) | Full-fat works best for richness |
| Confectioners’ sugar | 1 cup | Also known as powdered sugar |
| Heavy cream, cold | 1 ½ cups | Whips into a light, airy texture |
| Vanilla extract | 1 teaspoon | Pure vanilla for best flavor |
| Mixed berries (strawberries, blueberries, raspberries) | 2 cups | Fresh is best for topping these mini dessert cups |
| Lemon zest (optional) | 1 teaspoon | Adds a bright, fresh note to the filling |
Substitutions & Variations
The beauty of these Mini Desserts Cups lies in their versatility. You can easily adapt this recipe to fit dietary needs, flavor preferences, or whatever you have available in your pantry. These individual dessert cups are truly a canvas for your creativity!
- Crust Alternatives: Instead of graham crackers, try crushed Oreo cookies for a chocolatey twist, vanilla wafers for a classic flavor, or even crushed pretzels for a salty-sweet crunch. For a gluten-free option, use gluten-free graham crackers or a nut-based crust made from finely ground almonds or pecans mixed with butter.
- Filling Innovations: While cream cheese is divine, consider alternatives. A lemon curd layer offers a zesty tang. Chocolate mousse creates a rich, indulgent treat. You could also use a simple Greek yogurt mixture with honey for a lighter, more protein-packed option in your mini desserts cups. For dairy-free individual dessert cups, use a plant-based cream cheese alternative and coconut cream (chilled solid part) whipped for the topping.
- Fruit Fancy: Swap out the mixed berries for whatever seasonal fruit you love. Sliced peaches, mangoes, cherries, kiwi, or even roasted apples with cinnamon all work wonderfully. A tropical twist with pineapple and coconut flakes would also be fantastic for these mini dessert cups.
- Flavor Boosters: Add a tablespoon of cocoa powder to the cream cheese filling for a chocolate cheesecake cup. Incorporate a little espresso powder for a mocha flavor. A hint of almond extract alongside vanilla can add another layer of complexity to your tiny treat cups.
- Boozy Bliss: For an adult version, drizzle a little liqueur over the crust before adding the filling. Amaretto, Kahlúa, or Grand Marnier would all be delicious in these elegant mini desserts cups.
- Nutty Toppings: Sprinkle chopped nuts like pistachios, walnuts, or pecans on top for added texture and flavor.
- Sweeteners: Adjust the sugar in the filling to your taste. You can also use maple syrup or agave nectar as natural alternatives, though this might slightly change the texture of the cream cheese filling in your small dessert portions. These substitutions ensure your mini desserts cups are always fresh and exciting.
The beauty of these Mini Desserts Cups lies in their versatility. You can easily adapt this recipe to fit dietary needs, flavor preferences, or whatever you have available in your pantry. For a delightful twist, try out this Mini Pavlova with Berries.
Step-by-Step Instructions
Creating these delightful Mini Desserts Cups is straightforward and fun! Follow these steps for perfect, individual dessert cups every time. Remember, the key is chilling for the best texture.
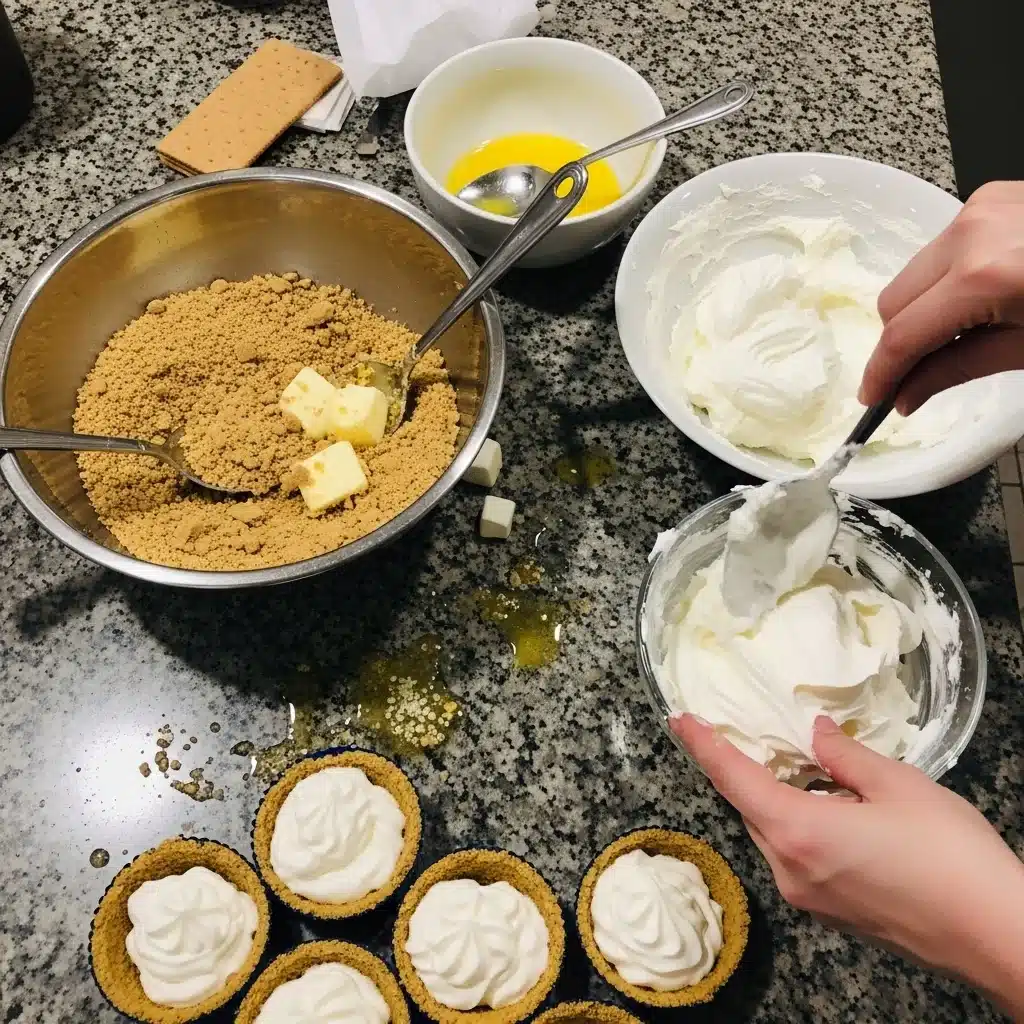
- Prepare the Crust: In a medium bowl, combine the graham cracker crumbs, melted butter, and granulated sugar. Mix thoroughly until the crumbs are evenly moistened. This forms the delicious base for your mini dessert cups.
- Press the Crust: Divide the graham cracker mixture evenly among about 12-16 small dessert cups or mini mason jars (4-6 oz size works well). Use the back of a spoon or your fingers to firmly press the mixture into the bottom of each cup. Place the cups in the refrigerator to chill for at least 15 minutes while you prepare the filling. This step is crucial for firm mini desserts cups.
- Make the Cream Cheese Filling: In a large mixing bowl, beat the softened cream cheese with an electric mixer on medium speed until smooth and creamy. Gradually add the confectioners’ sugar and lemon zest (if using), continuing to beat until fully incorporated and no lumps remain. Scrape down the sides of the bowl as needed. This creates a luscious center for your individual dessert cups.
- Whip the Cream: In a separate, clean, cold bowl, pour the cold heavy cream and add the vanilla extract. Beat on high speed with an electric mixer until stiff peaks form. Be careful not to overbeat, or it might curdle. This whipped cream provides a light, airy texture to your mini desserts cups.
- Combine the Filling: Gently fold about half of the whipped cream into the cream cheese mixture using a spatula. Be gentle to maintain the airiness. Then, carefully fold in the remaining whipped cream until just combined. You want a light, fluffy filling for your individual dessert cups.
- Assemble the Mini Desserts Cups: Retrieve the chilled crusts. Spoon or pipe the cream cheese filling into each cup over the graham cracker crust. You can use a piping bag with a wide tip for a neater look, or simply spoon it in. Fill each cup almost to the top.
- Add Berries and Chill: Top each of your filled mini dessert cups generously with fresh mixed berries. You can arrange them artfully or just sprinkle them on top. Once topped, place all the Mini Desserts Cups back into the refrigerator to chill for at least 2-4 hours. Chilling allows the filling to set properly and the flavors to meld beautifully. For the best results, chill overnight.
- Serve and Enjoy: When ready to serve, pull your gorgeous individual dessert cups from the fridge and watch them disappear! These delightful mini desserts cups are perfect for any gathering.
Pro Tips for Success
Making these Mini Desserts Cups is quite simple, but a few professional tips can elevate your individual dessert cups from great to absolutely extraordinary. Pay attention to these details for perfect results every time.
- Use Room Temperature Cream Cheese: This is a non-negotiable step! Softened cream cheese will blend smoothly without lumps, ensuring a silky-smooth filling for your mini dessert cups. Cold cream cheese will result in a lumpy texture, no matter how long you beat it.
- Chill Your Bowl and Whisk for Whipped Cream: For the best whipped cream, place your mixing bowl (preferably metal) and whisk attachment in the freezer for 10-15 minutes before whipping the heavy cream. This helps the cream whip up faster and achieve stiffer peaks, ensuring a light and airy texture in your mini desserts cups.
- Don’t Overmix the Filling: Once you fold in the whipped cream, stop mixing as soon as everything is just combined. Overmixing will deflate the air from the whipped cream, resulting in a denser filling. You want light and fluffy individual dessert cups!
- Firmly Press the Crust: A well-packed crust is essential for mini desserts cups that hold together. Use the bottom of a glass or a measuring cup to really press those crumbs down. This prevents crumbling when you dig in.
- Use a Piping Bag for Presentation: While spooning the filling into your tiny treat cups works perfectly fine, using a piping bag with a large round or star tip creates a more professional and elegant presentation. It makes your homemade mini desserts cups look store-bought!
- Taste and Adjust Sweetness: Before adding the final whipped cream, taste your cream cheese mixture. If you prefer it sweeter, add more confectioners’ sugar, a tablespoon at a time, until it’s just right. Everyone has different preferences for individual dessert cups.
- Plan Ahead for Chilling: The chilling time is crucial for these delicious mini dessert cups. It allows the filling to set properly and the flavors to fully develop. Make them the night before for maximum flavor and ease of serving. These make-ahead tiny treat cups will save you time later.
- Garnish Just Before Serving: While some toppings like berries can go on during the initial chill, if you’re using delicate garnishes like fresh mint sprigs, chocolate shavings, or a light dusting of cocoa, add them right before serving to keep them fresh and vibrant on your mini desserts cups.
Making these Mini Desserts Cups is quite simple, but a few professional tips can elevate your individual dessert cups from great to absolutely extraordinary. To ensure a silky-smooth filling, remember to use room temperature cream cheese and consider these tips in our Mini Pineapple Upside Down Cakes.
Storage & Reheating Tips
One of the best features of these delightful Mini Desserts Cups is their make-ahead convenience and excellent shelf life. Properly storing your individual dessert cups ensures they stay fresh and delicious for days.
- Refrigeration is Key: Always store your finished Mini Desserts Cups in the refrigerator. The cream cheese and whipped cream filling requires consistent chilling to maintain its texture and prevent spoilage.
- Airtight Container: Place the individual dessert cups in an airtight container. If you have several, arrange them carefully so they don’t get squished. If your cups have lids, use them! This prevents the desserts from absorbing odors from other foods in the fridge and keeps them from drying out.
- How Long Do They Last?: When stored correctly in an airtight container in the refrigerator, these mini dessert cups will stay fresh and delicious for up to 3-4 days. The crust might soften slightly over time, but the flavors will still be fantastic.
- Freezing (Optional): You can freeze these tiny treat cups, though the texture of the cream cheese might change slightly upon thawing. To freeze, place the uncovered mini desserts cups in the freezer for about an hour until firm. Then, wrap each cup individually in plastic wrap, and place them in an airtight freezer-safe container or bag. They can be frozen for up to 1 month.
- Thawing Frozen Mini Desserts Cups: To thaw, simply transfer the frozen individual dessert cups to the refrigerator and let them thaw overnight. Remove any plastic wrap before serving. The fruit might release a little more liquid after thawing, but they will still be enjoyable.
- No Reheating Necessary: These are cold desserts! Do not attempt to reheat your mini desserts cups, as this will melt the filling and ruin the texture. Serve them chilled directly from the refrigerator for the best experience.
What to Serve With This Recipe
These elegant Mini Desserts Cups are incredibly versatile and pair beautifully with a variety of beverages and light meals. Their individual portions make them a perfect end to almost any gathering.

- Coffee or Tea: A classic pairing! A warm cup of freshly brewed coffee, a comforting latte, or your favorite herbal tea complements the richness of these individual dessert cups perfectly. The coffee’s bitterness contrasts wonderfully with the sweet creaminess of the mini dessert cups.
- Sparkling Wine or Prosecco: For a more sophisticated occasion, a chilled glass of sparkling wine or Prosecco is an excellent choice. The bubbles and crispness provide a lovely counterpoint to the decadent tiny treat cups.
- Fruit-Infused Water: If you’re looking for a non-alcoholic and refreshing option, serve these delicious mini desserts cups with water infused with cucumber and mint, or slices of lemon and berries. It’s light and hydrating.
- After a Light Meal: These mini desserts cups are ideal after a lighter meal, such as a fresh salad with grilled chicken, a simple pasta dish, or delicate seafood. They provide a satisfying sweet finish without being overly heavy.
- Brunch Spreads: Individual dessert cups are fantastic additions to a brunch buffet. They pair well with quiches, fruit platters, pastries, and egg dishes, offering a sweet treat among savory options.
- As Part of a Dessert Bar: If you’re hosting a party, include these mini dessert cups as part of a larger dessert bar alongside brownies, cookies, or other small bites. This offers guests a variety of choices.
- Simple Celebration: No special meal needed! Enjoy these lovely mini desserts cups on their own as a simple indulgence during an afternoon break or a quiet evening.
These elegant Mini Desserts Cups are incredibly versatile and pair beautifully with a variety of beverages and light meals. For an ideal pairing, try them alongside our Mango Sticky Rice Cups.
FAQs
Can I make these Mini Desserts Cups ahead of time?
Absolutely! In fact, making these Mini Desserts Cups ahead of time is highly recommended. The flavors meld and the filling sets beautifully when chilled for several hours, or even overnight.
Prepare them the day before your event, cover them tightly, and store them in the refrigerator. This allows you to serve perfectly chilled, delicious individual dessert cups without any last-minute stress.
What kind of cups should I use for these Mini Desserts Cups?
You have many options for serving your Mini Desserts Cups! Small glass jars (like 4-6 oz mini mason jars), small tumblers, clear plastic dessert cups, ramekins, or even small teacups all work wonderfully. I often use clear cups so you can see the beautiful layers of these individual dessert cups. The key is to choose something that holds approximately 4-6 ounces and allows for easy layering and serving.
Are these Mini Desserts Cups healthy?
While these Mini Desserts Cups contain indulgent ingredients like cream cheese and sugar, their individual portion size helps with moderation. You can make them “healthier” by using light cream cheese, reducing the sugar content, or incorporating more fresh fruit. Using a whole-grain cracker for the crust or adding a Greek yogurt layer can also boost nutritional value. They are a treat, but you have control over the ingredients to make them fit your lifestyle for these individual dessert cups.
Can I use frozen berries for these Mini Desserts Cups?
Yes, you can use frozen berries for these Mini Desserts Cups, but with a slight modification. Thaw them completely and drain any excess liquid thoroughly before adding them to your cups. Frozen berries tend to release more water as they thaw, which could make your dessert soggy. For the best texture and vibrant appearance, fresh berries are preferred for topping these delightful mini dessert cups.
How can I make the crust stay firm?
To ensure a firm crust for your Mini Desserts Cups, make sure to firmly press the graham cracker mixture into the bottom of each cup. Use the back of a spoon or a small measuring cup to compact it well. Additionally, chilling the crust in the refrigerator for at least 15-30 minutes before adding the filling is crucial. This helps the butter solidify and binds the crumbs together, creating a sturdy base for your individual dessert cups.
Mini Desserts Cups are versatile and visually appealing treats that are perfect for various occasions, making dessert enjoyable and accessible. These delightful servings can be customized in numerous ways, offering a unique spin on traditional desserts, as detailed in dessert-related articles.
Nutrition Information (per serving)
Please note that this is an estimated nutritional breakdown for one Mini Desserts Cups serving and can vary based on specific brands, ingredient choices, and exact portion sizes. This estimate is based on approximately 14 servings.
| Nutrient | Amount |
|---|---|
| Calories | 350 kcal |
| Total Fat | 25g |
| Saturated Fat | 15g |
| Cholesterol | 75mg |
| Sodium | 180mg |
| Total Carbohydrates | 28g |
| Dietary Fiber | 1g |
| Total Sugars | 20g |
| Protein | 4g |

Mini Desserts Cups
These Mini Desserts Cups are simple, no-bake individual desserts that are perfect for any occasion, allowing for easy customization based on preferences.
- Total Time: 30 mins
- Yield: 12 servings 1x
Ingredients
1 ½ cups Graham cracker crumbs
½ cup Melted unsalted butter
¼ cup Granulated sugar
16 oz Cream cheese, softened
1 cup Confectioners’ sugar
1 ½ cups Heavy cream, cold
1 teaspoon Vanilla extract
2 cups Mixed berries (strawberries, blueberries, raspberries)
1 teaspoon Lemon zest (optional)
Instructions
- In a medium bowl, combine the graham cracker crumbs, melted butter, and granulated sugar. Mix until crumbs are moistened
- Divide the mixture among dessert cups and press down to form the crust. Chill for at least 15 minutes
- Beat the cream cheese until smooth, then add confectioners' sugar and lemon zest. Mix until fully combined
- In a separate bowl, whip the heavy cream and vanilla until stiff peaks form
- Fold half of the whipped cream into the cream cheese mixture, then fold in the rest until combined
- Spoon or pipe the filling into the chilled crusts and top with mixed berries. Chill for 2-4 hours or overnight before serving
Notes
Use room temperature cream cheese for the best texture.
Make ahead and chill for maximum flavor and ease.
- Prep Time: 20 mins
- Cook Time: 10 mins
- Category: Dessert
- Method: No-Bake
- Cuisine: American
- Diet: Vegetarian
Nutrition
- Serving Size: 1 cup
- Calories: 350 kcal
- Sugar: 20g
- Sodium: 180mg
- Fat: 25g
- Saturated Fat: 15g
- Unsaturated Fat: 0g
- Trans Fat: 0g
- Carbohydrates: 28g
- Fiber: 1g
- Protein: 4g
- Cholesterol: 75mg